标签 OpenCode 下的文章

之前做了个简单的 opencoed 的介绍和插件 Oh my code 的 Ultrawork 模式多 agent 的说明

很多佬说不会配置 今天瞎搓了一个配置管理器 就是简单的参数映射编辑
对于不喜欢搞 json 格式的佬们省了个心 懒得费那劲的佬们可以试试
初版肯定有很多问题 还在重构界面中 临时先用 0.6.4

PS:操作前先备份原始配置文件~~ 切记!切记!切记!

新更新 opencode 默认是关闭 think 模式的 新增了 think 选项 如果你的模型支持 think 可以添加 添加之后才会有

7:30 又是爆肝的一夜 一口气更新迭代了 10 个版本
上下文压缩 (Compaction)
选项 / 变体 配置结构
MCP 服务器配置
外部导入功能
Skill 管理

Rules 管理

Agent 管理
该有的咱家人都要有

这就是 ulw 模式的魅力~

有任何问题和建议欢迎留言 我们大家一起来完善他
本人胆小! 高手勿喷..

觉得有帮助帮我点个 star


📌 转载信息
原作者:
icysaintdx
转载时间:
2026/1/14 10:36:55

这是一个愚蠢的错误,因为长久以来我一直觉得 baseurl 可能不用加 /v1 (而且我也不理解,因为 baseurl 顾名思义就是基础 url, 所以我一直不理解), 除非出错了我才会想起来应该加 v1, 如果有大佬知道希望解惑一下


放一个仪表盘
你可能发现你的请求在 CLIPROXY 里看起来经常成功,但是 opencode 会卡住,要么是开始卡住,要么是新 task 的时候卡住,开始卡住是因为开始用的就是 CLIPROXY 的模型,新 task 卡住是因为新 task 配的模型是 CLIPROXY 模型
不知道为什么没有人提过这个问题,可能成功者的成功千篇一律,失败者的失败万里挑一吧
考虑到确实困扰了我一段时间,所以虽然很搞笑,但是我还是发出来了
但是我还是感觉很莫名其妙:baseurl 没有加 v1, 返回的全是页面首页,CLIPROXY 以为成功了所以不会报错,opencode 不知道为什么也不会报错,所以很难找出 bug, 除非灵机一动用 curl 看了看输出


📌 转载信息
原作者:
prosumer
转载时间:
2026/1/12 17:10:29

opencode 是什么就不需要我多说了,是一个非常好用的聚合的 TUI coding agent,原生支持 LSP 和 ASP,很适合佬友们有一堆渠道站的用法。

但是在搭配 codex 的时候,经常会出现下面这些问题

  1. Items not found
all 10 attempts failed: HTTP 404: 
{
    "error": {
        "code": null,
        "message": "{\n \"error\": {\n \"message\": \"Item with id 'rs_jgs9diuh934hu9shag09phq9raf0' not found. Items are not persisted when `store` is set to false. Try again with `store` set to true, or remove this item from your input.\",\n \"type\": \"invalid_request_error\",\n \"param\": \"input\",\n \"code\": null\n  }\n}(traceid: 824gj32q80-94gj-08)",
        "param": null,
        "type": "invalid_request_error"
    }
}

核心问题就是这个 items 字段。codex 全部使用的是有状态的 response api,所以 opencode 默认不会携带上下文给 api,而是只提供一个 item_id ,提供了一种更优雅的方案。
但是 L 站的转发,显然是没办法支持这个的,所以我们需要添加一个关键参数:

"store": false 

这样就会在每次都传递完整的上下文给中转站了。

  1. 不命中缓存
    为了节约宝贵的 token,现在各大中转站也都支持 prompt cache 了,但是也需要在配置文件中启用一下配置:
 "setCacheKey": true 

综上,给各位佬友们一个综合一些的 opencode.jsonc 的完整配置,mcp 就各位佬友自己随便定制啦

{
  "$schema": "https://opencode.ai/config.json",
  "model": "foxcode/google/gemma-3n-e4b",
  "provider": {
    "example": {
      "npm": "@ai-sdk/openai",
      "name": "example",
      "options": {
        "baseURL": "https://new.example.com/codex/v1",
        "setCacheKey": true
      },
      "models": {
        "gpt-5-2-high": {
          "id": "gpt-5.2",
          "name": "GPT 5.2 High",
          "options": {
            "reasoningEffort": "high",
            "textVerbosity": "low",
            "reasoningSummary": "auto",
            "store": false
          }
        },
        "gpt-5-2-medium": {
          "id": "gpt-5.2",
          "name": "GPT 5.2 Medium",
          "options": {
            "reasoningEffort": "medium",
            "textVerbosity": "low",
            "reasoningSummary": "auto",
            "store": false
          }
        },
        "gpt-5-2-xhigh": {
          "id": "gpt-5.2",
          "name": "GPT 5.2 XHigh",
          "options": {
            "reasoningEffort": "xhigh",
            "textVerbosity": "low",
            "reasoningSummary": "auto",
            "store": false
          }
        }
      }
    }
  },
  "mcp": {
    "auggie-mcp": {
      "type": "local",
      "command": [
        "auggie",
        "--mcp"
      ],
      "enabled": true
    },
    "chrome-devtools-mcp": {
      "type": "local",
      "command": [
        "npx",
        "-y",
        "chrome-devtools-mcp@latest"
      ],
      "enabled": false
    },
    "deepwiki": {
      "type": "remote",
      "url": "https://mcp.deepwiki.com/mcp",
      "enabled": true
    },
    "sequential-thinking": {
      "type": "local",
      "command": [
        "npx",
        "-y",
        "@modelcontextprotocol/server-sequential-thinking"
      ],
      "enabled": true
    }
  }
}

📌 转载信息
转载时间:
2026/1/12 10:37:54

解决办法如下:

来看看这个 opencode-anthropic-auth 1.9 日改了什么?

claude 请求入参修改:

  1. 请求增加了 user-agent 判断(属于是 server 判断的常用手段)
  2. 修改了 TOOL_PREFIX(A 社这波属于是硬编码了)
  3. url query 增加了 beta=true

返回结果:

  1. 重新修改 tool name

题外话: VVCode 也及时做了适配


📌 转载信息
原作者:
allen_zhang
转载时间:
2026/1/11 08:41:40

1. 点击 JetBraisns 右上角的 3 个点
2. 然后选择 config acp agent
3. 会在编辑其中打开一个 acp.json
4. 将 opencode 的配置写进去

{ "agent_servers": { "OpenCode": { "command": "/absolute/path/bin/opencode", "args": ["acp"] } } } 

5. 注意 command 要换成你自己的
6. 由于我使用的 windows 并且我使用 npm i -g opencode-ai 安装 opencode , 佬有可以在 shell 使用这两个命令查看
$root = (npm root -g)
Get-ChildItem $root -Recurse -Filter opencode.exe -ErrorAction SilentlyContinue | Select-Object -First 5 FullName
将 exe 的路径写入 command

7. 然后就可以使用了,也可以使用中转站的模型


📌 转载信息
原作者:
Bink
转载时间:
2026/1/8 12:22:01

之前有佬友发了白嫖老黄的 nvidia/minimax-m2.1 模型

正好最近在试用 opencode,就尝试配置了一下,放出配置文件给大家参考下 ~/.config/opencode/opencode.json

{ "$schema": "https://opencode.ai/config.json", "mcp": { "augment-context-engine": { "type": "local", "command": [ "auggie", "--mcp" ], "enabled": true }, "sequential": { "type": "local", "command": [ "npx", "@modelcontextprotocol/server-sequential-thinking" ], "enabled": true }, "playwright": { "type": "local", "command": [ "npx", "@playwright/mcp@latest" ], "enabled": true }, "context7": { "type": "local", "command": [ "npx", "@upstash/context7-mcp@latest" ], "enabled": true } }, "provider": { "nvidia": { "npm": "@ai-sdk/openai-compatible", "options": { "baseURL": "https://integrate.api.nvidia.com/v1", "apiKey": "你的 apikey" }, "models": { "minimax-m2.1": { "id": "minimaxai/minimax-m2.1" } } } }, "model": "nvidia/minimax-m2.1" } 

配置好之后重启 opencode,就可以看到模型生效拉


当然 Kilo 也可以跑,配置起来更简单,这里就不放配置了


📌 转载信息
原作者:
zhuxiaojian
转载时间:
2026/1/8 12:14:18

相信各位都有白嫖到這兩家訂閱吧!
需求: oh-my-opencode 插件然後驗證登入 (這些有大佬教)。但更多和模型可能還有問題,尤其是 Codex,參考來源: https://github.com/numman-ali/opencode-openai-codex-auth/blob/main/docs/getting-started.md
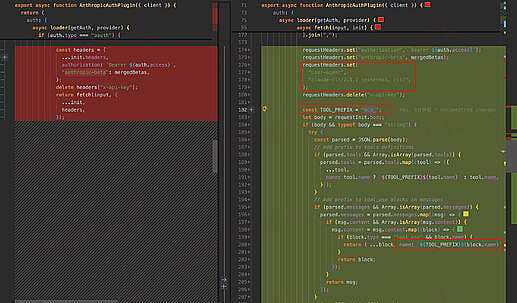
分享我的 opencode.json 配置:更 1 開頭忘加 "antigravity-",來源: https://github.com/NoeFabris/opencode-antigravity-auth

{
  "plugin": [
    "oh-my-opencode",
    "opencode-antigravity-auth@1.2.7",
    "opencode-openai-codex-auth"
  ],
  "provider": {
    "google": {
      "name": "Google",
      "models": {
        "antigravity-gemini-3-pro-high": {
          "name": "Gemini 3 Pro High (Antigravity)",
          "attachment": true,
          "limit": {
            "context": 1048576,
            "output": 65535
          },
          "modalities": {
            "input": [
              "text",
              "image",
              "pdf"
            ],
            "output": [
              "text"
            ]
          }
        },
        "antigravity-gemini-3-pro-low": {
          "name": "Gemini 3 Pro Low (Antigravity)",
          "attachment": true,
          "limit": {
            "context": 1048576,
            "output": 65535
          },
          "modalities": {
            "input": [
              "text",
              "image",
              "pdf"
            ],
            "output": [
              "text"
            ]
          }
        },
        "antigravity-gemini-3-flash": {
          "name": "Gemini 3 Flash (Antigravity)",
          "attachment": true,
          "limit": {
            "context": 1048576,
            "output": 65536
          },
          "modalities": {
            "input": [
              "text",
              "image",
              "pdf"
            ],
            "output": [
              "text"
            ]
          }
        },
        "antigravity-claude-sonnet-4-5": {
          "name": "Claude Sonnet 4.5 (Antigravity)",
          "limit": {
            "context": 200000,
            "output": 64000
          },
          "modalities": {
            "input": [
              "text",
              "image",
              "pdf"
            ],
            "output": [
              "text"
            ]
          }
        },
        "antigravity-claude-sonnet-4-5-thinking-low": {
          "name": "Claude Sonnet 4.5 Think Low (Antigravity)",
          "limit": {
            "context": 200000,
            "output": 64000
          },
          "modalities": {
            "input": [
              "text",
              "image",
              "pdf"
            ],
            "output": [
              "text"
            ]
          }
        },
        "antigravity-claude-sonnet-4-5-thinking-medium": {
          "name": "Claude Sonnet 4.5 Think Medium (Antigravity)",
          "limit": {
            "context": 200000,
            "output": 64000
          },
          "modalities": {
            "input": [
              "text",
              "image",
              "pdf"
            ],
            "output": [
              "text"
            ]
          }
        },
        "antigravity-claude-sonnet-4-5-thinking-high": {
          "name": "Claude Sonnet 4.5 Think High (Antigravity)",
          "limit": {
            "context": 200000,
            "output": 64000
          },
          "modalities": {
            "input": [
              "text",
              "image",
              "pdf"
            ],
            "output": [
              "text"
            ]
          }
        },
        "antigravity-claude-opus-4-5-thinking-low": {
          "name": "Claude Opus 4.5 Think Low (Antigravity)",
          "limit": {
            "context": 200000,
            "output": 64000
          },
          "modalities": {
            "input": [
              "text",
              "image",
              "pdf"
            ],
            "output": [
              "text"
            ]
          }
        },
        "antigravity-claude-opus-4-5-thinking-medium": {
          "name": "Claude Opus 4.5 Think Medium (Antigravity)",
          "limit": {
            "context": 200000,
            "output": 64000
          },
          "modalities": {
            "input": [
              "text",
              "image",
              "pdf"
            ],
            "output": [
              "text"
            ]
          }
        },
        "antigravity-claude-opus-4-5-thinking-high": {
          "name": "Claude Opus 4.5 Think High (Antigravity)",
          "limit": {
            "context": 200000,
            "output": 64000
          },
          "modalities": {
            "input": [
              "text",
              "image",
              "pdf"
            ],
            "output": [
              "text"
            ]
          }
        }
      }
    },
    "openai": {
      "options": {
        "reasoningEffort": "medium",
        "reasoningSummary": "auto",
        "textVerbosity": "medium",
        "include": ["reasoning.encrypted_content"],
        "store": false
      },
      "models": {
        "gpt-5.2-codex-low": {
          "name": "GPT 5.2 Codex Low (OAuth)",
          "limit": {
            "context": 272000,
            "output": 128000
          },
          "options": {
            "reasoningEffort": "low",
            "reasoningSummary": "auto",
            "textVerbosity": "medium",
            "include": ["reasoning.encrypted_content"],
            "store": false
          }
        },
        "gpt-5.2-codex-medium": {
          "name": "GPT 5.2 Codex Medium (OAuth)",
          "limit": {
            "context": 272000,
            "output": 128000
          },
          "options": {
            "reasoningEffort": "medium",
            "reasoningSummary": "auto",
            "textVerbosity": "medium",
            "include": ["reasoning.encrypted_content"],
            "store": false
          }
        },
        "gpt-5.2-codex-high": {
          "name": "GPT 5.2 Codex High (OAuth)",
          "limit": {
            "context": 272000,
            "output": 128000
          },
          "options": {
            "reasoningEffort": "high",
            "reasoningSummary": "detailed",
            "textVerbosity": "medium",
            "include": ["reasoning.encrypted_content"],
            "store": false
          }
        },
        "gpt-5.1-codex-max": {
          "name": "GPT 5.1 Codex Max (OAuth)",
          "limit": {
            "context": 272000,
            "output": 128000
          },
          "options": {
            "reasoningEffort": "high",
            "reasoningSummary": "detailed",
            "textVerbosity": "medium",
            "include": ["reasoning.encrypted_content"],
            "store": false
          }
        },
        "gpt-5.1-codex-max-low": {
          "name": "GPT 5.1 Codex Max Low (OAuth)",
          "limit": {
            "context": 272000,
            "output": 128000
          },
          "options": {
            "reasoningEffort": "low",
            "reasoningSummary": "detailed",
            "textVerbosity": "medium",
            "include": ["reasoning.encrypted_content"],
            "store": false
          }
        },
        "gpt-5.1-codex-max-medium": {
          "name": "GPT 5.1 Codex Max Medium (OAuth)",
          "limit": {
            "context": 272000,
            "output": 128000
          },
          "options": {
            "reasoningEffort": "medium",
            "reasoningSummary": "detailed",
            "textVerbosity": "medium",
            "include": ["reasoning.encrypted_content"],
            "store": false
          }
        },
        "gpt-5.1-codex-max-high": {
          "name": "GPT 5.1 Codex Max High (OAuth)",
          "limit": {
            "context": 272000,
            "output": 128000
          },
          "options": {
            "reasoningEffort": "high",
            "reasoningSummary": "detailed",
            "textVerbosity": "medium",
            "include": ["reasoning.encrypted_content"],
            "store": false
          }
        },
        "gpt-5.1-codex-max-xhigh": {
          "name": "GPT 5.1 Codex Max Extra High (OAuth)",
          "limit": {
            "context": 272000,
            "output": 128000
          },
          "options": {
            "reasoningEffort": "xhigh",
            "reasoningSummary": "detailed",
            "textVerbosity": "medium",
            "include": ["reasoning.encrypted_content"],
            "store": false
          }
        },
        "gpt-5.2-low": {
          "name": "GPT 5.2 Low (OAuth)",
          "limit": {
            "context": 272000,
            "output": 128000
          },
          "options": {
            "reasoningEffort": "low",
            "reasoningSummary": "auto",
            "textVerbosity": "low",
            "include": ["reasoning.encrypted_content"],
            "store": false
          }
        },
        "gpt-5.2-medium": {
          "name": "GPT 5.2 Medium (OAuth)",
          "limit": {
            "context": 272000,
            "output": 128000
          },
          "options": {
            "reasoningEffort": "medium",
            "reasoningSummary": "auto",
            "textVerbosity": "medium",
            "include": ["reasoning.encrypted_content"],
            "store": false
          }
        },
        "gpt-5.2-high": {
          "name": "GPT 5.2 High (OAuth)",
          "limit": {
            "context": 272000,
            "output": 128000
          },
          "options": {
            "reasoningEffort": "high",
            "reasoningSummary": "detailed",
            "textVerbosity": "high",
            "include": ["reasoning.encrypted_content"],
            "store": false
          }
        }
      }
    }
  },
  "$schema": "https://opencode.ai/config.json"
}

先申明:若有其他技術問題我可能不會 我只會 Vibe,因此才想懶人分享下


📌 转载信息
原作者:
FanChung818
转载时间:
2026/1/8 10:34:42

前言

最近 opencode 似乎爆火了,我也在自己电脑上下载了一个(搭配 oh-my-opencode)试了一下,用 Anthropic 正版的账号走浏览器登录(OAuth)是没问题的,但用公益站(AnyRouter 等)、中转站(claude-rely-servicesub2api 等)、本地代理(CLIProxyAPIAntigravity-Manager 等)配置起来极其繁琐,苦不堪言

正文

假设你已经安装了 opencodeoh-my-opencode 可有可无),可以有两种方式去配置任何非官方模型渠道:

简单粗暴版(推荐,不折腾)

  1. 命令行输入 opencode auth login
  2. 选择 Anthropic
  3. 选择 Manually enter API Key
  4. 输入你的对应渠道的 API Key(这个我相信你肯定能自己找到并输入)
  5. 打开 opencode.json(mac 用户的话就在 ~/.config/opencode/opencode.json,其他平台需要搜一下文档之类的)
  6. provider 插入 anthropic 对象,重载 baseURL(这是最基础的 JSON 编辑,如果编辑出来有问题别找我,去让 AI 帮你改):
     "provider": { "anthropic": { "options": { "baseURL": "你的渠道的Claude Code API URL地址/v1" } },
       ...其他原有的配置
     } 

    注意,大概率要在渠道给你的 API_URL 后面加个 /v1,例如 WONG公益站的话就是 https://wzw.pp.ua/v1

  7. 改一下模型,因为渠道里用的模型名可能是 claude-sonnet-4-5-20250929claude-opus-4-5-20251101,在 opencode.json 里加入或修改字段:
    "model": "anthropic/claude-sonnet-4-5-20250929", // 或 anthropic/claude-opus-4-5-20251101 
  8. 如果用了 oh-my-opencode 则需要顺便配置一下 oh-my-opencode.json(mac 用户的话就在 ~/.config/opencode/oh-my-opencode.json,其他平台需要搜一下文档之类的),把里面全部用到 claude-* 的模型都改一下:
    "model": "anthropic/claude-sonnet-4-5-20250929" // 或 anthropic/claude-opus-4-5-20251101 

自定义供应商

  1. 命令行输入 opencode auth login
  2. 选择 Other
  3. 输入你渠道名,英文全小写,这个就是 provider id(例如我们这里输入 test
  4. 输入你的对应渠道的 API Key(这个我相信你肯定能自己找到并输入)
  5. 打开 opencode.json(mac 用户的话就在 ~/.config/opencode/opencode.json,其他平台需要搜一下文档之类的)
  6. provider 插入新对象,把你的渠道加进去(这是最基础的 JSON 编辑,如果编辑出来有问题别找我,去让 AI 帮你改):
     "provider": { "test": { "npm": "@ai-sdk/anthropic", "name": "你的渠道名,用于显示到opencode的界面的", "options": { "baseURL": "你的渠道的Claude Code API URL地址/v1" }, "models": { "claude-sonnet-4-5-20250929": { "name": "Claude 4.5 Sonnet", "attachment": true, "limit": { "context": 1048576, "output": 65535 }, "modalities": { "input": [ "text", "image" ], "output": [ "text" ] } }, "claude-opus-4-5-20251101": { "name": "Claude 4.5 Opus", "attachment": true, "limit": { "context": 1048576, "output": 65535 }, "modalities": { "input": [ "text", "image" ], "output": [ "text" ] } } } },
       ...其他原有的配置
     } 

    注意,大概率要在渠道给你的 API_URL 后面加个 /v1,例如 WONG公益站的话就是 https://wzw.pp.ua/v1

  7. 改一下模型,因为渠道里用的模型名可能是 claude-sonnet-4-5-20250929claude-opus-4-5-20251101,在 opencode.json 里加入或修改字段:
    "model": "test/claude-sonnet-4-5-20250929", // 或 test/claude-opus-4-5-20251101 
  8. 如果用了 oh-my-opencode 则需要顺便配置一下 oh-my-opencode.json(mac 用户的话就在 ~/.config/opencode/oh-my-opencode.json,其他平台需要搜一下文档之类的),把里面全部用到 claude-* 的模型都改一下:
    "model": "test/claude-sonnet-4-5-20250929" // 或 test/claude-opus-4-5-20251101 

注意,记得把这里的 test 换成你自己的 provider id

效果


我们注意到,效果图2 用的是 sonnet4.5 出来的是 sonnet3.7,参考这个:

限制

  • 某些平台禁止非 Claude Code CLI 使用(如 88codeWONG公益站的Claude Code 0.25倍率专属分组

    WONG公益站可以用 default 分组,但这样就是 1 倍率了,小心使用…
    如果有大佬知道咋解决请在评论区里教教我

  • cc-switch 这种改 claude配置的工具对 opencode 没啥用,除非弄个 opencode-switch(不知道有没有)

总结

我们的保姆级教程就到这了,我也就用了半小时 opencode,目前感觉 UI 很炫酷,然后能自动识别和使用 claude code 的 skill 之类的,还自动用了 ralph 这个神器去防止会话自行终止(挂机摸鱼必备),要是能把更多公益站和中转站对接进来就好了!

记得点赞收藏~(跪谢)

引用


📌 转载信息
原作者:
jnx
转载时间:
2026/1/7 19:05:17

OpenCode 使用 CLIProxyAPI 作为模型提供商的步骤

写在前面:不要质疑我的某些操作,虽然繁琐,但自有深意。例如为什么我要将 CPA 的提供商分为 4 个,以及为什么要这样配置常用模型。如果存在意见不合,那就是你对。

opencode 作为开源的终端代理,配合 ohmyopencode 使用,是目前十分推荐且前沿的玩法,核心是异步子代理协作(也就是十分烧钱),虽然官方提供了免费的 minimax2.1 和其他几个模型,但使用高级子代理完成前端设计、审查时,仍然需要用高级模型,为此特意写了这个教程,供佬们参考。
难点:opencode 将 key 和 Provider 配置分离储存,且需要自行选择对应的 sdk,避免格式问题,以下配置中已包含推荐用法。

1. 绑定 API 密钥

在 OpenCode 终端执行以下操作,为四个自定义 ID 注册凭据:

  1. 终端执行命令:opencode auth login 注意不是在 opencode 里执行
  2. 选择 Other(这里不需要手动滚动,很累,直接输入 other,会自动列出)
  3. 依次创建以下 ID 并粘贴 API Key:
  • cpa
  • cpa-oai
  • cpa-claude
  • cpa-gemini


2. 修改配置文件

编辑全局的 opencode.json( macOS / Linux: ~/.config/opencode/ Windows: Users\你的用户名\ .config\opencode),将以下内容整合进 provider 字段,我给出的仅供参考,不会就直接复制,删掉自己不要的模型即可。所有模型已开启 thinking 模式 (未来官方可能会弃用该字段) ,并按协议类型匹配了 SDK。

{ "$schema": "https://opencode.ai/config.json", "plugin": [ "oh-my-opencode"], "provider": { "cpa": { "npm": "@ai-sdk/openai-compatible", "name": "cpa", "options": { "baseURL": "https://<YOUR_ENDPOINT>/v1" }, "models": { "kimi-k2-thinking": { "name": "kimi-k2-thinking", "thinking": true }, "glm-4.7": { "name": "glm-4.7", "thinking": true } } }, "cpa-oai": { "npm": "@ai-sdk/openai", "name": "cpa-oai", "options": { "baseURL": "https://<YOUR_ENDPOINT>/v1" }, "models": { "gpt-5.2": { "name": "gpt-5.2", "thinking": true }, "gpt-5.1-codex-max": { "name": "gpt-5.1-codex-max", "thinking": true } } }, "cpa-claude": { "npm": "@ai-sdk/anthropic", "name": "cpa-claude", "options": { "baseURL": "https://<YOUR_ENDPOINT>/v1" }, "models": { "gemini-claude-opus-4-5-thinking": { "name": "gemini-claude-opus-4-5-thinking", "thinking": true }, "gemini-claude-sonnet-4-5-thinking": { "name": "gemini-claude-sonnet-4-5-thinking", "thinking": true }, "claude-opus-4-5-20251101": { "name": "claude-opus-4-5-20251101", "thinking": true }, "claude-sonnet-4-5-20250929": { "name": "claude-sonnet-4-5-20250929", "thinking": true }, "claude-haiku-4-5-20251001": { "name": "claude-haiku-4-5-20251001", "thinking": true }, "claude-kimi": { "name": "claude-kimi", "thinking": true } } }, "cpa-gemini": { "npm": "@ai-sdk/google", "name": "cpa-gemini", "options": { "baseURL": "https://<YOUR_ENDPOINT>/v1beta" }, "models": { "gemini-3-pro-preview": { "name": "gemini-3-pro-preview", "thinking": true }, "gemini-3-flash-preview": { "name": "gemini-3-flash-preview", "thinking": true }, "gemini-2.5-flash-lite": { "name": "gemini-2.5-flash-lite", "thinking": true } } } } } 


3. 切换模型

  1. 重载:保存文件,OpenCode 自动生效。
  2. 选择:输入 /models 弹出列表。
  3. 识别:根据 cpa-* 前缀找到对应模型,回车确认。


(PS:模型回复为 3.7 模型,是因为 CPA 内置了一部分提示词的干扰,无影响)

额外补充

不建议通过 cpa 反代 codex 再接入 opencode,当前版本的 cpa 和 opencode 似乎有兼容性问题,会导致模型列表消失,需要重新登录凭证。(多个群友复现)
建议使用 ohmyopencode 直接 oauth 登录 codex


📌 转载信息
原作者:
moxiyan
转载时间:
2026/1/5 16:19:05

分享一个自己在写的小工具。

起因是之前用 CLIProxyAPI 来使用 Antigravity 里的 Claude 模型,体验不太好,写着写着就断了。后来在论坛看到有佬推荐 OpenCode,试了一下真的很丝滑。但是现在论坛里分享的配置工具基本都是给 Claude Code 做的,OpenCode 没有现成的可视化配置工具,每次都要手改 JSON 挺麻烦。于是就干脆自己撸了一个。

定位

这个就是给自己日常使用的小工具箱,按需添加功能。目前有的功能:

  • OpenCode 配置管理:可视化编辑供应商和模型,告别手撸 JSON
  • Claude Code 配置管理:顺手也支持了,一键切换供应商(本人用的少,所以只是简单支持了一下,重点使用的建议还是使用 CC-Switch)
  • 供应商统一管理:API Key、代理地址集中管理
  • 数据备份:本地备份 + WebDAV 云端同步
  • 自动更新检查:有新版本会提醒

OpenCode 配置

Claude Code 配置

设置页面

后续计划

  • AI 绘图
  • 其他想到的小功能…

技术相关

Tauri 2 + React + TypeScript,数据全部存本地,支持 Windows /macOS/ Linux。

下载

顺便分享一个 OpenCode 安装踩坑

使用 NPM 安装: npm install -g opencode-ai

如果你本地 npm 源设置的是淘宝镜像,安装 OpenCode 可能会遇到这个报错:

It seems that your package manager failed to install the right version of the opencode binary…

原因:淘宝镜像源有些包没有正常同步。
解决方案:切换到腾讯镜像源
npm install -g nrm && nrm use tencent && npm install -g opencode-ai
腾讯镜像源文档: npm

感兴趣的可以试试,同时也希望大家帮忙给仓库点个 Star,有其他需求的也欢迎提 Issue 或 PR!


📌 转载信息
转载时间:
2026/1/5 12:55:42

之前用过 @shekohex 的 opencode-google-antigravity-auth@NoeFabris 的 opencode-antigravity-auth
两边的功能都想要,所以把它们合了。

主要功能:

  • google_search 工具集成(来自 @shekohex
  • CLI / Anti quota 支持,通过 opencode auth login 使用(来自 @NoeFabris
  • Google Antigravity OAuth 认证,支持自动刷新 token
  • 支持 gemini-3-pro-high、claude-opus-4-5-thinking 等模型
  • 以及两个插件原有的其他优秀功能

安装方式:

{ "plugin": ["opencode-antigravity-auth-remix@1.0.7"] } 

仓库地址:GitHub - Darkstarrd-dev/opencode-antigravity-auth

现在可以在 opencode 里爽用双重额度,真的是踩不完,完全踩不完

antigravity 反人类,回到 opencode 舒服太多


📌 转载信息
转载时间:
2026/1/5 12:14:55