用 ASCII 绘图作为 AI 白板
做了一个支持中文的 ASCII 画布
众所周知现在的模型视觉得分是不如结构化文本的
市面上的 ascii 工具要么不支持中文,要么字符集缺乏
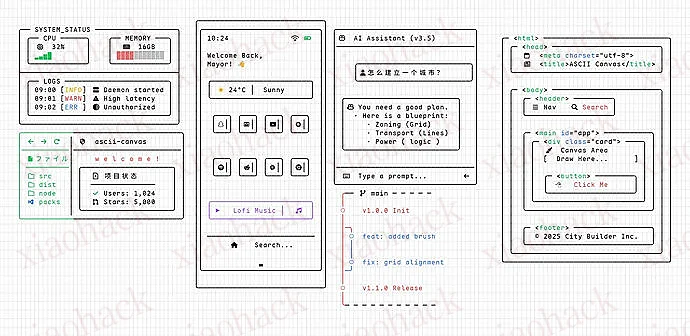
vibe coding 了一个 ascii 画布:原生支持中文、Emoji 和 Nerd Fonts
AI 友好:输出的是语义化网格,AI 读得懂,也能直接改。
源码地址:github
在线体验:ascii-canvas
xiaohack博客专注前沿科技动态与实用技术干货分享,涵盖 AI 代理、大模型应用、编程工具、文档解析、SEO 实战、自动化部署等内容,提供开源项目教程、科技资讯日报、工具使用指南,助力开发者、AI 爱好者获取前沿技术与实战经验。
做了一个支持中文的 ASCII 画布
众所周知现在的模型视觉得分是不如结构化文本的
市面上的 ascii 工具要么不支持中文,要么字符集缺乏
vibe coding 了一个 ascii 画布:原生支持中文、Emoji 和 Nerd Fonts
AI 友好:输出的是语义化网格,AI 读得懂,也能直接改。
源码地址:github
在线体验:ascii-canvas
https://store.epicgames.com/zh-CN/p/the-callisto-protocol


活着逃离恐怖的木卫四。 游戏独具一格,融合了射击与近距离作战,玩家需要调整战术与迅速进化的生物作战,同时从废物中寻找有用物品来解锁新武器和装备,以逃脱木星死亡卫星中越来越可怕的威胁。
不用登录就可以用,用几次后要求登录
可以开无痕窗口,要求登录时再开一个新的接着用
部分支持模型:
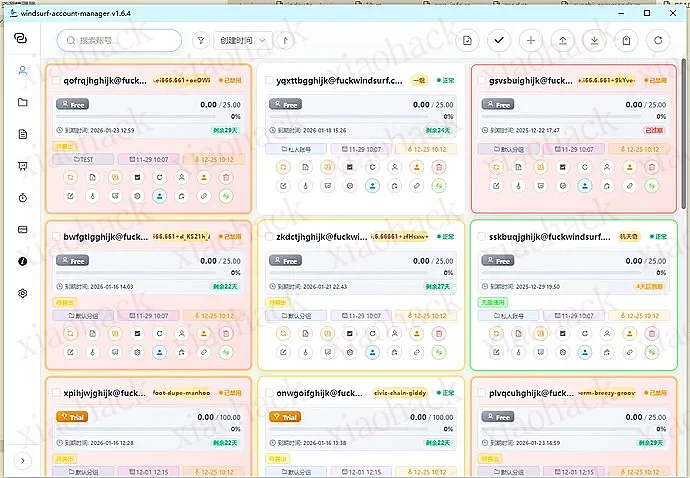
Zephyr 大佬 Windsurf Account Manager 工具开源了,曾经可无限重置积分在某些学生工具党的暗黑手段下落下帷幕,可叹可恨。强势支持 Z 佬开源大义行为。
另外跪求佬们给 Z 佬加 star,给小菜我也点个赞。谢谢!
https://github.com/chaogei/windsurf-account-manager-simple
1、找一部安卓机,下载 Apple Music
2、创建 Apple 账户,国家地区选择 “美国”
3、再找一台苹果设置,登录刚注册账户,爽用
全程无需梯子,自带应用商店就能下载 Apple Music
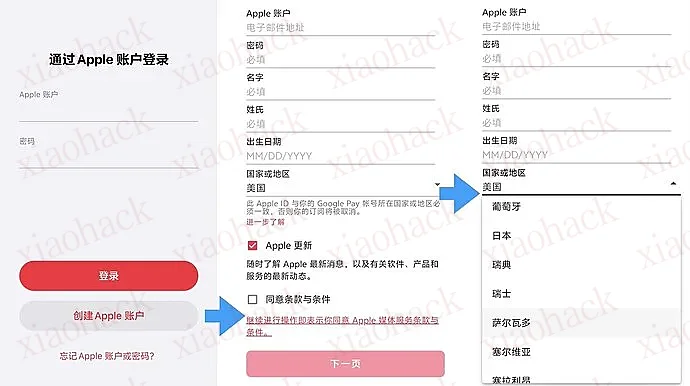
此方法注册苹果账号的优势在于:
你想注册哪个区的,就注册哪个区
一直注册到你满意为止
土区、尼区、日区、阿拉伯区
本文为转载内容,保留原帖观点与结构;如有侵权请联系我处理。
才发现新版本竟然收费了,这不能忍,找到了直接可以下的旧版本。
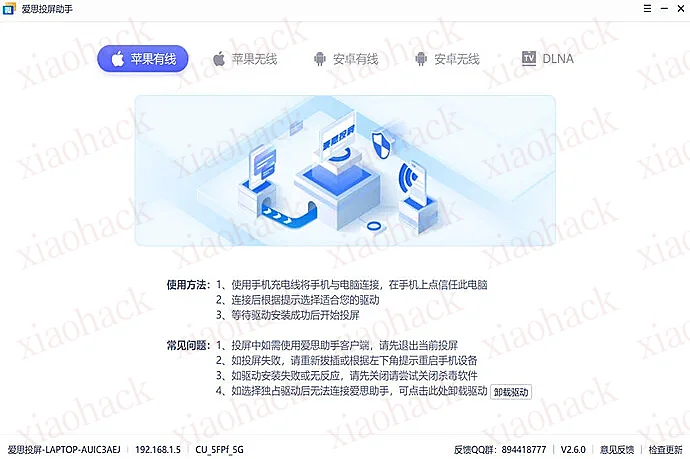
专业的屏幕投影工具,轻松将手机屏幕投影到电脑上。
支持苹果安卓有线无线,同时开启投屏。
留住精彩,投屏录制同步进行。
多渠道推流,轻松玩直播。
爱思投屏助手软件特色
增加有线连接,插上即可投屏。
简单易用,使用轻松。
无需热点,没有 WiFi 也可以投屏。
iOS / 安卓 / 有线 / 无线,随意组合。
支持 iOS / 安卓同时投屏。
画质清晰、连接稳定。
多分辨率满足您的需求。
本文为转载内容,保留原帖观点与结构;如有侵权请联系我处理。
GLM-4.7 上线并开源。
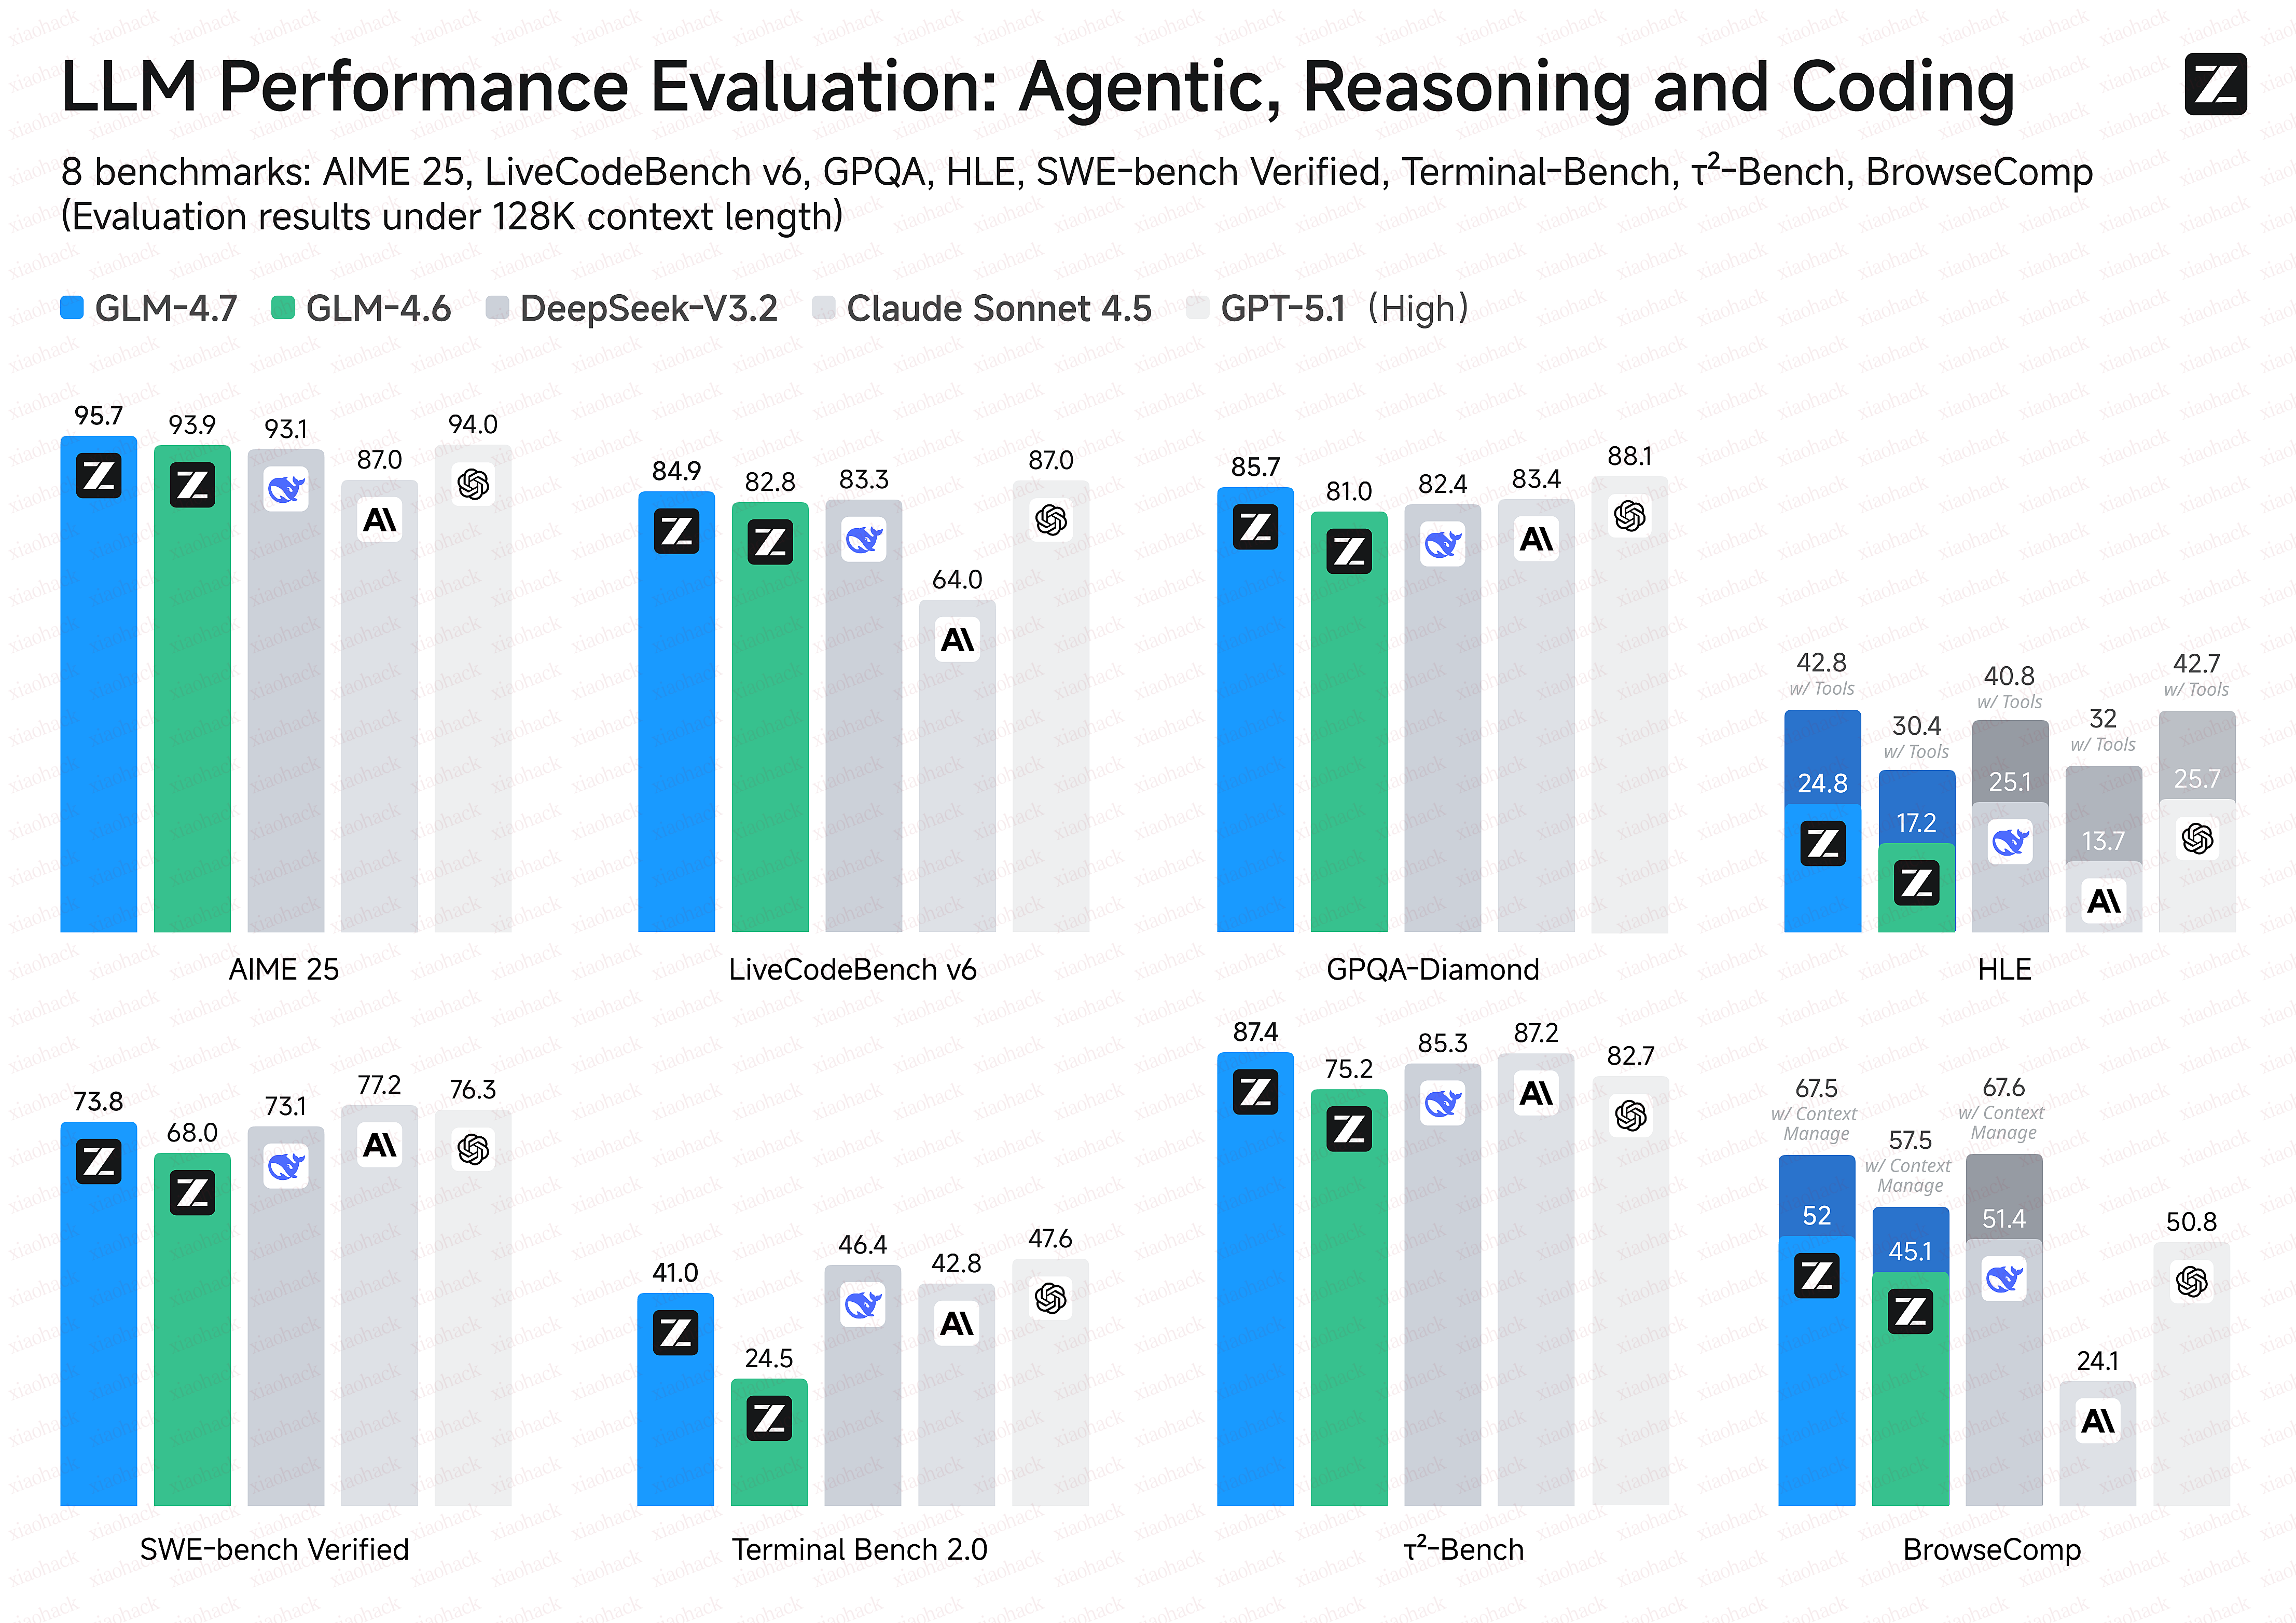
新版本面向 Coding 场景强化了编码能力、长程任务规划与工具协同,并在多项主流公开基准测试中取得开源模型中的领先表现。
目前,GLM-4.7 已通过 BigModel.cn 提供 API ,并在 z.ai 全栈开发模式中上线 Skills 模块,支持多模态任务的统一规划与协作。
Coding 能力再提升
GLM-4.7 在编程、推理与智能体三个维度实现突破:
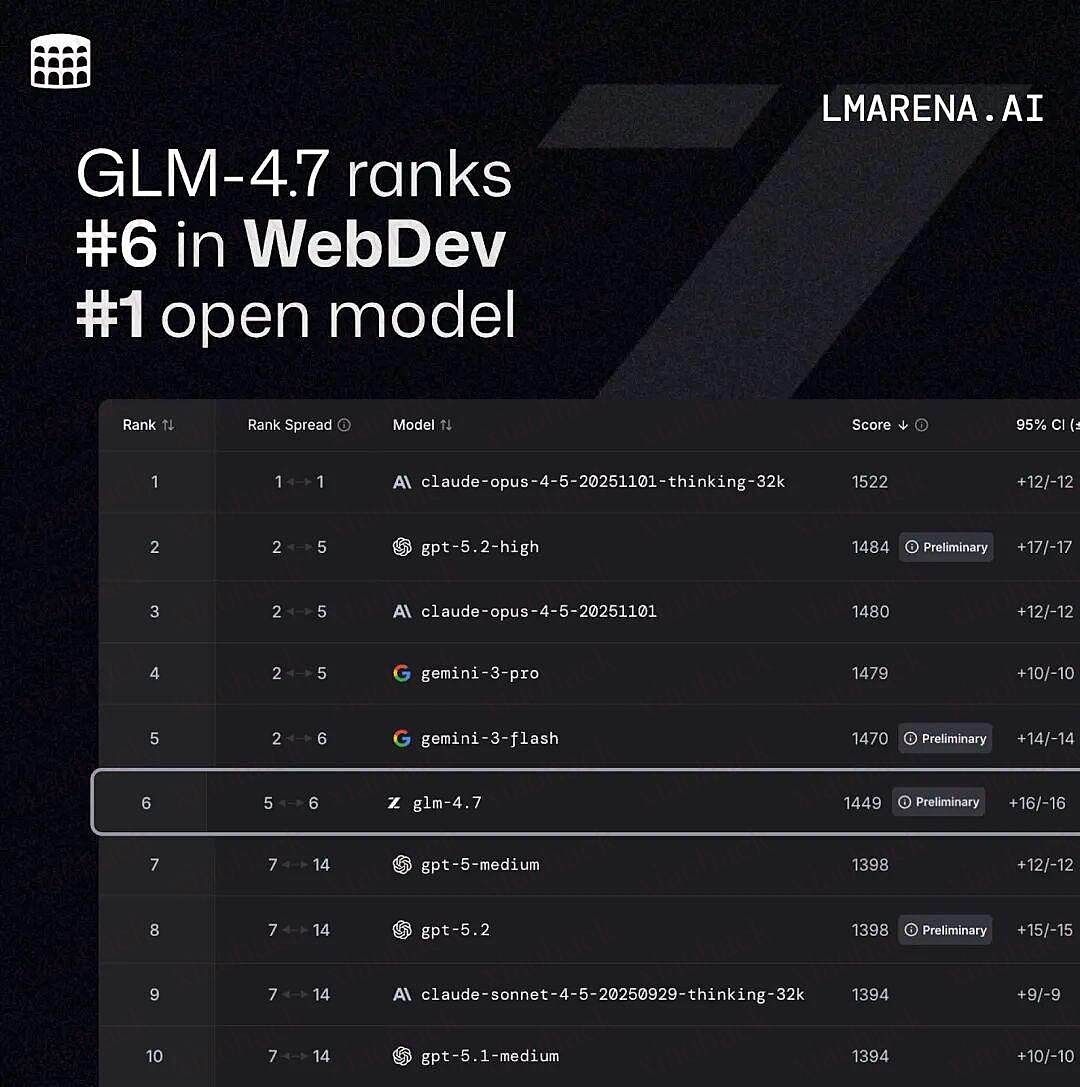
Code Arena:全球百万用户参与盲测的专业编码评估系统,GLM-4.7 位列开源第一、国产第一,超过 GPT-5.2 。
在主流基准测试表现中,GLM-4.7 的代码能力对齐 Claude Sonnet 4.5:
在 SWE-bench-Verified 获得 73.8% 的开源 SOTA 分数;
在 LiveCodeBench V6 达到 84.9% 的开源 SOTA 分数,超过 Claude Sonnet 4.5 ;
SWE-bench Multilingual 达到 66.7%(提升 12.9%);
Terminal Bench 2.0 达到 41%(提升 16.5%)。
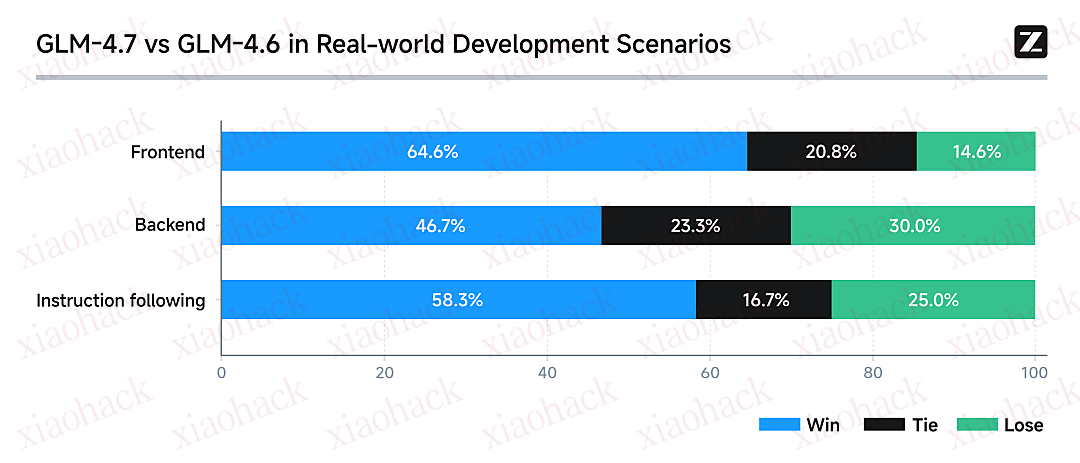
真实编程场景下的体感提升
在 Claude Code 环境中,我们对 100 个真实编程任务进行了测试,覆盖前端、后端与指令遵循等核心能力。结果显示,GLM-4.7 相较 GLM-4.6 在稳定性与可交付性上均有明显提升。
GLM Coding Plan
作为本次升级的首个体验权益,所有购买套餐的用户将获得「体验卡」礼包,可邀请 3–7 位新用户免费体验 7 天套餐权益。
领取链接:[https://zhipuaishengchan.datasink.sensorsdata.cn/t/kc]
本文为转载内容,保留原帖观点与结构;如有侵权请联系我处理。
Fun-CosyVoice3-0.5B-2512 语音合成服务的简化部署方案,以及快速测试和部署提供应用 API 调用,部署可实现 vLLM 加速、流式音频输出、可选采样率输出、多音色复刻、GPU 加速重采样、Speaker 特征缓存等性能和功能点。提供人工部署过程和一键部署以及应用服务实例代码,直接现成可用。同时列举了一些常见部署问题和解决方案。
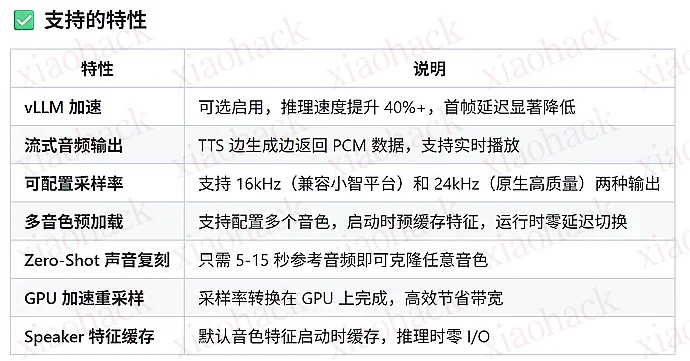
捣鼓了两天,跑了起来,并提供经验分享
详见开源地址:GitHub - fengin/Fun-CosyVoice3-0.5B-2512-Deploy: Fun-CosyVoice3-0.5B-2512 语音合成服务的简化部署方案,以及快速测试和部署提供应用调用
本文为转载内容,保留原帖观点与结构;如有侵权请联系我处理。
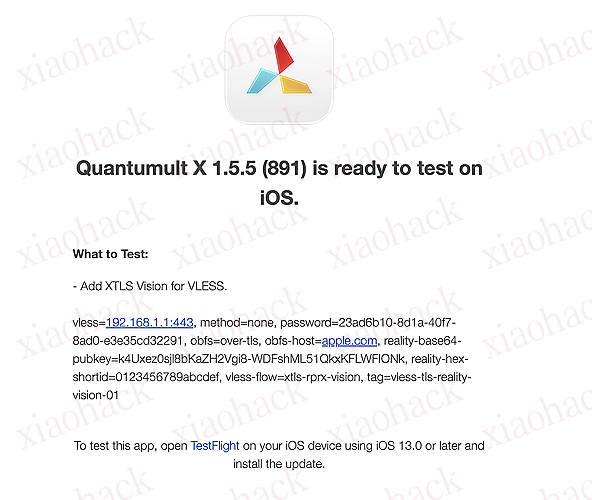
最新的 Testflight 已经支持啦,佬们又多一个选择可以用通用服务端啦
本文为转载内容,保留原帖观点与结构;如有侵权请联系我处理。
刚发现了 Nano Banana Pro 的一个有趣提示词


请为影视剧/小说《需要添加的名称》设计一张高品质的3D海报,需要先检索影视剧/小说信息和著名的片段场景。

首先,请利用你的知识库检索这个影视剧/小说的内容,找出一个最具代表性的名场面或核心地点。在画面中央,将这个场景构建为一个精致的轴侧视角3D微缩模型。风格要采用梦工厂动画那种细腻、柔和的渲染风格。你需要还原当时的建筑细节、人物动态以及环境氛围,无论是暴风雨还是宁静的午后,都要自然地融合在模型的光影里。

关于背景,不要使用简单的纯白底。请在模型周围营造一种带有淡淡水墨晕染和流动光雾的虚空环境,色调雅致,让画面看起来有呼吸感和纵深感,衬托出中央模型的珍贵。

最后是底部的排版,请生成中文文字。居中写上小说名称,字体要有与原著风格匹配的设计感。在书名下方,自动检索并排版一句原著中关于该场景的经典描写或台词,字体使用优雅的衬线体。整体布局要像一个高级的博物馆藏品铭牌那样精致平衡。 本文为转载内容,保留原帖观点与结构;如有侵权请联系我处理。

Generate a Christmas-themed image of a beautiful young girl with a "pure desire" (innocent yet alluring) aesthetic. Keep the face consistent with the reference.
Character Appearance & Styling
Hair: Loose, low double-braids decorated with colorful fabric balls. Messy, fluffy strands of hair blend naturally with the headpiece.
Headpiece: A small, neat, cone-shaped Christmas tree fixed to the top of her head. It features a gold star on top and is richly decorated with colorful lights, gold bells, bow knots, and small red, blue, and gold ornaments.
Face & Makeup: Fair "cold-white" skin, smooth as jade. Natural red-brown eyeshadow gradient. An innocent gaze with a dreamy "pure desire" filter.
Clothing: A soft, fluffy red plush top.
Pose & Atmosphere
Action: Holding a Santa Claus plush toy with both hands. She is tilting her head slightly in a playful, cute, and beautiful pose.
Expression: Full of festive celebration; a contrast of cuteness and sexiness.
Vibe: A warm, healing Christmas atmosphere.
Technical & Artistic Style
Photography: Studio soft lighting, 70mm film portrait style. Low contrast, low saturation, delicate film grain, and slight chromatic aberration/glow.
Composition: Medium shot, warm white background, unique but formal composition.
Artistic Elements: * The outline of the character is traced with green graffiti.
The surrounding white space is filled with cute hand-drawn Christmas doodles (collage style).
The silhouette is wrapped in fluorescent red, green, and gold dashed lines and polka dots.
The words "MERRY CHRISTMAS" are written everywhere in a cute font.
本文为转载内容,保留原帖观点与结构;如有侵权请联系我处理。
AI 工具现在多到爆炸,用得好那是降维打击,用不好就真成 “差生文具多” 了:收藏一堆神器,特来分享。此为分享经验,不是本人开发的工具,也不是推广哈 (叠个甲) bushi
先来看看有哪些好用 ai 乱世出来的工具吧,贴个汇总图,防止大家懒得看,因为我这人也比较邪修,工具搞手里很多,用这就发现奇奇怪怪的搭配,可能不是最佳,但分享一下看看是不是大家都用过了
- Antigravity Tools :我一般是用来可以用来看 Antigravity 编辑器 额度的,比较详细,用插件看也行【支持 api】
- proxyCast:只要是用来看 kiro 和切换账号的,用来看额度也不错【支持 api】
- ccNexus: 作为中枢了,因为上面都支持 2api,那全部都接入这里,公益站也接入这里,接完你的接你的,一个一个来。
- cc-Switch:用来切换 claude cli 工具,感觉挺好,习惯了,虽然 proxyCast 也支持切换配置
- cherry studio:就是用来桌面聊天客户端了,不多说了
贴一些工具界面图,后面用来说明如何将它们联通起来
端口:3000

因为 Antigravity Tools 和 ProxyCast 都有 api 服务,所以将他们都接入 ccNexus 中


然后就可以去配置 cc-Switch,接入 3000 端口
这个时候就可以使用 claude cli 或者 cherry studio
在 cherry 中模型没法获取,手工填写就行,不支持自动获取模型,毕竟 ccNexus 是给 cli 用的
最后看一下效果就是这样:
好了总结一下

Antigravity Tools
prixyCast
GitHub - aiclientproxy/proxycast: 让 AI 编辑器之间自然流动,不仅仅可以其他工具使用,也可以转换成 api 为本地开发提供动力。
ccNexus
cherry studio
本文为转载内容,保留原帖观点与结构;如有侵权请联系我处理。
TLDR(省流版)
:为解决实际代码编写过程中官方 fetch 工具由于安全或者版权限制,导致无法获取对应链接内容,利用 Grok 具有高效搜索能力以及最弱版权 & 内容审查, 替换官方 search 以及 fetch 功能,极大的拓展 Vibe Coding 对于信息的获取以及利用能力。
github 链接:
GitHub - GuDaStudio/GrokSearch: Integrate Grok's powerful real-time search capabilities into Claude via the MCP protocol!
PS: 如果好用的话欢迎点个 star 哦
佬友们好啊,不知道大家都用上多模型协同的 MCP 没,之前用孙佬的 Codex MCP 以及 Gemini MCP,使用多模型协同对天气卡片做了一个小小的测试,对这种多模型协同的方式非常感兴趣
【自己动手,丰衣足食 00】 Claude 和 CodeX 协同办公很好,我很爱,可是官方 mcp 写的实在太烂
【自己动手,丰衣足食 01】 写了个 Gemini-MCP,因为我实在受不了 Gemini CLI 的”API Error: “,也让我看到了 agents 已来
【多模型 MCP 协同 真的有用吗?】A Better Weather Card 御三家(Claude, Codex, Gemini)协作生成天气卡片的实践分析
之后的一段时间更深度的体验了这种多模型 MCP 协同工作的模式,这种多模型 MCP 协同可以说真正的让独立开发者得到了解放。上手一个新技术或者开发一个新项目现在只要具备一定工程思想,能盘的清楚逻辑,看得懂代码,对于技术上的要求已经降低到难以置信的程度,甚至一个没有开发过网页的小白也能在几天内开发一个非常炫酷的应用。
而目前的多模型 MCP 开发模式,主要依托于各家 CLI 之间的相互协作,并且由于各模型具有自身的特长,逐渐形成这样的认知以及分工:
Claude Code 负责实际代码撰写
Codex 用于函数原型设计 & 复杂逻辑检测
Gemini 用于前端设计
尽管已经可以非常完备了,但由于各大模型具有不同程度的内容审查以及安全校验,使得目前模型在面临网页 & 文档检索上存在很大限制,下面以 Chat 途径的 Cherry studio 为例:
对于相同的提示词我们使用 Gemini 3 pro、Claude Code 中转,以及 Grok 逆向渠道 来同时获得某个文档,我们发现:
Gemini 3 会有版权保护政策的限制,因此会对内容进行摘要或者修改,但是对于代码撰写的场景,这种对于文档的二次加工显然会对代码的撰写带来隐患的
Claude Code 可能是由于比较出色的工程能力,给了代码但是不直接获取对应的内容
Grok 完美地满足了最直接的需求:原封不动的返回结构化的网页信息
特别地 Claude Code 的官方工具具有更加严格的安全措施,使得访问链接时经常出现下面的类似提示:
即使正常调用 fetch 工具 但仍然可能得到空返回的现象,如下图所示:
而在使用 Grok-search MCP 之后,不仅可以解决上面的问题,而且依托于 Grok 强大的检索能力,甚至能检索到 Github Issue 的相关内容(以上测试仅为实际开发过程中遇到的一个例子),而在使用 Grok mcp search 之后:
这里 Grok Search MCP 先调用 search 功能,搜索并总结摘要返回多个相关链接,这里甚至检索到 Github 的 Issue 去定位到问题,然后调用 fetch 功能获取网页中实际内容并进行分析
可以说做搜索 Grok 是非常专业的,不愧是国外社交媒体巨头推出的大模型,搜索推荐能力可以说非常顶级了
最终获得的返回也很好的帮我解决并定位了具体问题,实际使用体验应该还是挺不错的。
下面是项目的稍微正式一点介绍,方便佬友了解项目并配置部署环境,如果觉得内容不错的话,可以点个 star 哦,非常感谢 嘻嘻
github 链接:
GitHub - GuDaStudio/GrokSearch: Integrate Grok's powerful real-time search capabilities into Claude via the MCP protocol!作为国外互联网巨头之一的 Meta 出品的大模型,掌握了大量的社交媒体咨询以及搜索优化技术,使得 Grok 具有 远超其他模型的搜索能力。特别的由于版权或者安全措施的限制,其他模型对于直接获取网页内容、NSFW 等涉及敏感的权限操作具有非常严格的限制,但是社交媒体出身的 Grok 似乎对于这些信息并没有添加额外的过滤或者筛选,可以说 Grok 具有:
可以很方便的帮助我们获取想要的信息以及资讯。
基于上述,Grok 将成为最有希望补上 Vibe Coding 的最后一块拼图 — 实时信息的检索以及文档信息获取能力的最佳模型选择。
一句话总结 Grok Search MCP 就是:通过转接第三方平台(如 Grok)的强大搜索能力,为 Claude、Claude Code 等 AI 模型提供实时网络搜索功能。
| 特性 | Grok Search MCP | Google Custom Search API | Bing Search API | SerpAPI |
|---|---|---|---|---|
| AI 优化结果 | 专为 AI 理解优化 | 通用搜索结果 | 通用搜索结果 | 通用搜索结果 |
| 内容摘要质量 | AI 生成高质量摘要 | 需二次处理 | 需二次处理 | 需二次处理 |
| 实时性 | 实时网络数据 | 实时 | 实时 | 实时 |
| 集成复杂度 | MCP 即插即用 | 需自行开发 | 需自行开发 | 需自行开发 |
| 返回格式 | AI 友好 JSON | 需格式化 | 需格式化 | 需格式化 |
下面是一个快速上手以及部署的示例,甚至只需要一个命令行就可以完成安装以及配置(当然前提得先有 Grok API):
获取一个可以调用 Grok 的逆向渠道,考虑到通用性,目前实现了 OpenAI 格式
的 Grok 逆向渠道的支持
广告位招租(不是
站内有挺多 Grok 的逆向项目,获取 Grok 逆向的方式应该不难,而且成本几乎可以忽略不计
使用下面的命令行直接一键安装即可,注意替换 YOUR-API-URL 以及 YOUR-API-KEY:
claude mcp add-json grok-search --scope user '{

  "type": "stdio",

  "command": "uvx",

  "args": [

    "--from",

    "git+https://github.com/GuDaStudio/GrokSearch",

    "grok-search"

  ],

  "env": {

    "GROK_API_URL": "YOUR-API-URL",

    "GROK_API_KEY": "YOUR-API-KEY"

  }

}'
因为在实际使用中发现,很多佬友卡在第一步环境配置以及检测上,因此我们实现了一个 tool 用于检测环境是否正常。
只需要在 Claude Code 中输入文本:
“检测一下是否能正常使用 grok-search”
或者类似的表达,grok-search MCP 就会自动检查配置变量以及连通性测试。如果成功会有类似下面的返回结果:

由于 Claude Code 自己有 Search 以及 Fetch 工具,如果不通过提示词引导很可能会先调用内置工具,失败了后有概率再调用 Grok-search,因此如果希望尽可能发挥 Grok 的搜索能力需要使用系统提示词对于 Grok search MCP 的调用能力进行强化,我们分别构造了精简版以及详细版的体统提示词,具体内容比较长就放到 Github 的 README 中方便佬们自主编辑以及选择,具体操作也比较简单:
编辑~/.claude/CLAUDE.md
将系统提示词追加到该文件中
如果没有该文件的话可以直接创建,可以搭配别的系统提示词进行工作,也可以根据自己需求对系统提示词进行二次修改
然后就能愉快的使用了,我们主要实现了两个具体的 tools:
search url:用于进行检索
fetch content:用于获取网页内容
检索功能:我们特别的针对搜索平台以及检索范围进行优化,可以通过提示词(显式)或者默认的方式(隐式)根据内容对高质量的内容平台进行检索
网页内容获取:我们采用半结构化的 markdown 对网页内具有语义信息的内容进行完整的提取并组织,方便后续处理以及筛选
下面是一个小小的示例:
需求:查找一下 FastAPI 中关于 @mcp.tool 这个修饰器的作用(此时并没有指定具体文档链接)
流程:
通过系统提示词强化的 Grok-search MCP 先调用 Search 功能 来获取可能的文档链接(可能多个)
然后再通过 Fetch 功能 来获取对应链接的具体文本以及文档内容
结果:获取详细并且准确的文档信息之后,Claude Code 给出了具体的解释,并给出了官方原版的示例以及参考的链接,不仅有效避免了幻觉,并方便开发者进行二次确认。
以上是该 Grok-search 的相关介绍,后续可能会考虑:
基于 Grok 的搜索能力,在本地进行高效的 版本管理 以及 本地记忆库 的构建
减少频繁的 search 以及 fetch 请求
减少多版本 API 之间由于版本迭代导致的可能问题
本文为转载内容,保留原帖观点与结构;如有侵权请联系我处理。
继桌面版 ImageMinify 之后,推出了全新的在线版图片压缩工具 —— SnapImg
,无需安装,打开即用!
桌面版
https://github.com/Moresl/ImageMinify
作为开发者:
SnapImg 就是为解决这些痛点而生 —— 打开浏览器,拖入图片,一键压缩,即刻下载。
| 特性 | 说明 |
|---|---|
| 高压缩率 | PNG 使用 pngquant/imagequant 算法,压缩率可达 70%+ |
| 多格式支持 | 支持 PNG、JPEG、WebP、AVIF 格式互转 |
| 隐私安全 | 图片仅在内存中处理,不保存到服务器磁盘 |
| 批量处理 | 单次最多支持 20 张图片同时压缩 |
| 效果对比 | 滑动对比压缩前后效果,质量一目了然 |


前端:
后端:
底层同样基于高性能图片处理库 Pillow,延续了 ImageMinify 桌面版的优秀压缩能力,同时针对 Web 场景做了全面优化。
无需安装,打开浏览器即可使用:
** 在线体验:https://img.biekanle.com**
只需简单三步:
如果你希望在自己的服务器上部署,提供了 Docker 一键部署方案:
# 构建镜像
docker build -t snapimg .

# 运行容器
docker run -d -p 80:80 --name snapimg snapimg
SnapImg(在线版):https://github.com/Moresl/snapimg
:https://github.com/Moresl/ImageMinify
从桌面版 到在线版 SnapImg,始终专注于一件事:让图片压缩更简单、更高效。
不同场景,不同选择:
如果这个小工具对你有帮助,欢迎给项目点个 Star ,你的支持是持续优化的最大动力!
有问题或建议?欢迎在 GitHub 提 Issue 或留言交流,会及时响应和更新。
** 相关链接:**
让代码漏洞挖掘像呼吸一样简单,小白也能当黑客挖洞


 *首页快速进入 Multi-Agent 深度审计*
? 审计流日志 实时查看 Agent 思考与执行过程 |
?️ 智能仪表盘 一眼掌握项目安全态势 |
⚡ 即时分析 粘贴代码 / 上传文件,秒出结果 |
?️ 项目管理 GitHub/GitLab 导入,多项目协同管理 |
 *一键导出 PDF / Markdown / JSON*(图中为快速模式,非Agent模式报告)
? [查看Agent审计完整报告示例](https://lintsinghua.github.io/)
*一键导出 PDF / Markdown / JSON*(图中为快速模式,非Agent模式报告)
? [查看Agent审计完整报告示例](https://lintsinghua.github.io/)
DeepAudit 是一个基于 Multi-Agent 协作架构的下一代代码安全审计平台。它不仅仅是一个静态扫描工具,而是模拟安全专家的思维模式,通过多个智能体(Orchestrator, Recon, Analysis, Verification)的自主协作,实现对代码的深度理解、漏洞挖掘和 自动化沙箱 PoC 验证。
我们致力于解决传统 SAST 工具的三大痛点:
用户只需导入项目,DeepAudit 便全自动开始工作:识别技术栈 → 分析潜在风险 → 生成脚本 → 沙箱验证 → 生成报告,最终输出一份专业审计报告。
核心理念: 让 AI 像黑客一样攻击,像专家一样防御。
DeepAudit 采用微服务架构,核心由 Multi-Agent 引擎驱动。

| 步骤 | 阶段 | 负责 Agent | 主要动作 |
|---|---|---|---|
| 1 | 策略规划 | Orchestrator | 接收审计任务,分析项目类型,制定审计计划,下发任务给子 Agent |
| 2 | 信息收集 | Recon Agent | 扫描项目结构,识别框架/库/API,提取攻击面(Entry Points) |
| 3 | 漏洞挖掘 | Analysis Agent | 结合 RAG 知识库与 AST 分析,深度审查代码,发现潜在漏洞 |
| 4 | PoC 验证 | Verification Agent | (关键) 编写 PoC 脚本,在 Docker 沙箱中执行。如失败则自我修正重试 |
| 5 | 报告生成 | Orchestrator | 汇总所有发现,剔除被验证为误报的漏洞,生成最终报告 |
DeepAudit/
├── backend/                        # Python FastAPI 后端
│   ├── app/
│   │   ├── agents/                 # Multi-Agent 核心逻辑
│   │   │   ├── orchestrator.py     # 总指挥:任务编排
│   │   │   ├── recon.py            # 侦察兵:资产识别
│   │   │   ├── analysis.py         # 分析师:漏洞挖掘
│   │   │   └── verification.py     # 验证者:沙箱 PoC
│   │   ├── core/                   # 核心配置与沙箱接口
│   │   ├── models/                 # 数据库模型
│   │   └── services/               # RAG, LLM 服务封装
│   └── tests/                      # 单元测试
├── frontend/                       # React + TypeScript 前端
│   ├── src/
│   │   ├── components/             # UI 组件库
│   │   ├── pages/                  # 页面路由
│   │   └── stores/                 # Zustand 状态管理
├── docker/                         # Docker 部署配置
│   ├── sandbox/                    # 安全沙箱镜像构建
│   └── postgres/                   # 数据库初始化
└── docs/ # 详细文档复制一份 backend/env.example 为 backend/.env,并按需配置 LLM API Key。
然后执行以下命令一键启动:
# 1. 准备配置文件
cp backend/env.example backend/.env

# 2. 构建沙箱镜像 (首次运行必须)
cd docker/sandbox && chmod +x build.sh && ./build.sh && cd ../..

# 3. 启动服务
docker compose up -d
? 启动成功! 访问 http://localhost:3000 开始体验。
适合开发者进行二次开发调试。
cd backend
# 激活虚拟环境 (推荐 uv/poetry)
source .venv/bin/activate

# 安装依赖
pip install -r requirements.txt

# 启动 API 服务
uvicorn app.main:app --reloadcd frontend
npm install
npm run dev开发模式下,仍需通过 Docker 启动沙箱服务。
cd docker/sandbox
./build.sh| 漏洞类型 | 描述 |
|---|---|
sql_injection | SQL 注入 |
xss | 跨站脚本攻击 |
command_injection | 命令注入 |
path_traversal | 路径遍历 |
ssrf | 服务端请求伪造 |
xxe | XML 外部实体注入 |
| 漏洞类型 | 描述 |
|---|---|
insecure_deserialization | 不安全反序列化 |
hardcoded_secret | 硬编码密钥 |
weak_crypto | 弱加密算法 |
authentication_bypass | 认证绕过 |
authorization_bypass | 授权绕过 |
idor | 不安全直接对象引用 |
? 详细文档请查看 Agent 审计指南
? 国际平台
OpenAI GPT-4o / GPT-4 |
?? 国内平台
通义千问 Qwen |
? 本地部署
Ollama |
? 支持 API 中转站,解决网络访问问题 | 详细配置 → LLM 平台支持
| 功能 | 说明 | 模式 |
|---|---|---|
| ? Agent 深度审计 | Multi-Agent 协作,自主编排审计策略 | Agent |
| ? RAG 知识增强 | 代码语义理解,CWE/CVE 知识库检索 | Agent |
| ? 沙箱 PoC 验证 | Docker 隔离执行,验证漏洞有效性 | Agent |
| ?️ 项目管理 | GitHub/GitLab 导入,ZIP 上传,10+ 语言支持 | 通用 |
| ⚡ 即时分析 | 代码片段秒级分析,粘贴即用 | 通用 |
| ? 五维检测 | Bug · 安全 · 性能 · 风格 · 可维护性 | 通用 |
| ? What-Why-How | 精准定位 + 原因解释 + 修复建议 | 通用 |
| ? 审计规则 | 内置 OWASP Top 10,支持自定义规则集 | 通用 |
| ? 提示词模板 | 可视化管理,支持中英文双语 | 通用 |
| ? 报告导出 | PDF / Markdown / JSON 一键导出 | 通用 |
| ⚙️ 运行时配置 | 浏览器配置 LLM,无需重启服务 | 通用 |
我们正在持续演进,未来将支持更多语言和更强大的 Agent 能力。
无言 AI 公益站 开放注册啦!!
本站渠道为 kiro2api 逆向出来的渠道
不支持缓存 可接入 cc 使用
本站不定时清理不活跃用户,各位注册了可要猛猛蹬啊
注册限制邮箱后缀:
仅支持:qq.com、gmail.com、163.com
禁止邮箱别名
现有活动
注册送20刀
签到送20刀
邀请送30刀
API 地址
国内线路:https://aiai.li/register?aff=exDU (可注册)
国外线路:http://145.239.142.185:3009 (不可注册,当 endpoint 接入点)
基本上可以激活任意版本的finalshell 高级版、专业版")
开源项目仅供学习使用,请大家支持正版。
源代码如下
<!DOCTYPE html>
<html lang="en">
<head>
<meta charset="UTF-8">
<meta name="viewport" content="width=device-width, initial-scale=1.0">
<meta http-equiv="content-type" content="text/html; charset=utf-8" />
<meta name="description" content="FinalShell 离线激活码生成器 安全便捷地生成FinalShell各个版本的离线激活码,无需联网验证。本工具仅用于学习和测试目的,请支持正版软件" />
<title>FinalShell 离线激活码生成器</title>
<style>
* {
margin: 0;
padding: 0;
box-sizing: border-box;
}
body {
color: #00ffff;
font-family: 'Courier New', monospace;
background: linear-gradient(135deg, #0c0c0c 0%, #1a1a2e 25%, #16213e 50%, #0f3460 75%, #533483 100%);
min-height: 100vh;
overflow-x: hidden;
position: relative;
}
/* 动态背景粒子 */
.particles {
position: fixed;
top: 0;
left: 0;
width: 100%;
height: 100%;
pointer-events: none;
z-index: 1;
}
.particle {
position: absolute;
width: 2px;
height: 2px;
background: #00ffff;
border-radius: 50%;
animation: float 8s infinite linear;
box-shadow: 0 0 10px #00ffff;
}
@keyframes float {
0% {
transform: translateY(100vh) rotate(0deg);
opacity: 0;
}
10% {
opacity: 1;
}
90% {
opacity: 1;
}
100% {
transform: translateY(-100vh) rotate(360deg);
opacity: 0;
}
}
/* 网格背景 */
.grid-bg {
position: absolute;
top: 0;
left: 0;
width: 100%;
height: 100%;
/*background-image: linear-gradient(rgba(0, 255, 255, 0.1) 1px, transparent 1px),*/
/*linear-gradient(90deg, rgba(0, 255, 255, 0.1) 1px, transparent 1px);*/
background: repeating-linear-gradient(
0deg,
rgba(0, 255, 255, 0.05) 0px,
rgba(0, 255, 255, 0.05) 1px,
transparent 1px,
transparent 20px
),
repeating-linear-gradient(
90deg,
rgba(0, 255, 255, 0.05) 0px,
rgba(0, 255, 255, 0.05) 1px,
transparent 1px,
transparent 20px
);
animation: grid-move 2s linear infinite;
background-size: 100px 100px;
pointer-events: none;
z-index: 0;
}
@keyframes grid-move {
0% {
background-position: 0 0,
0 0;
}
100% {
background-position: 40px 40px,
40px 40px;
}
}
/* 主体框架 */
.ai-hud-component {
background-color: transparent;
display: flex;
justify-content: center;
align-items: center;
height: 100vh;
min-width: 100%;
position: relative;
overflow: hidden;
}
/* 框架 */
.ai-hud-frame {
border-radius: 10px;
display: flex;
flex-direction: column;
align-items: stretch;
position: relative;
padding: 1.5rem;
width: 30em;
background: rgba(0, 255, 255, 0.05);
border: 1px solid rgba(0, 255, 255, 0.2);
box-shadow: 0 0 30px rgba(0, 255, 255, 0.1);
z-index: 2;
animation: frame-pulse 5s infinite ease-in-out;
}
/* 输入框容器 */
.ai-hud-input-wrapper {
margin-bottom: 10px;
position: relative;
display: flex;
align-items: center;
z-index: 3;
}
/* 输入框 */
.ai-hud-input {
border-radius: 5px;
flex: 1;
background: transparent;
border: 1px solid rgba(0, 255, 255, 0.2);
outline: none;
color: #00ffff;
font-family: "Orbitron", sans-serif;
font-size: 1rem;
letter-spacing: 0.1em;
padding: 0.5rem 0.75rem;
caret-color: #00ffff;
transition: border 0.3s,
box-shadow 0.3s;
}
/* 输入框: 聚焦 */
.ai-hud-input:hover {
border: 1px solid rgba(0, 255, 255, 0.5);
box-shadow: 0 0 12px rgba(0, 255, 255, 0.3);
}
/* 输入框: 占位符 */
.ai-hud-input::placeholder {
color: rgba(0, 255, 255, 0.4);
}
/* 优化后的 autofill 样式 */
input:-webkit-autofill,
input:-webkit-autofill:hover,
input:-webkit-autofill:focus,
input:-webkit-autofill:active {
-webkit-background-clip: text;
-webkit-text-fill-color: #00ffff;
background-color: transparent !important;
}
input:-internal-autofill-selected {
background-color: transparent;
color: #00ffff;
}
/* 清除按钮 */
.ai-hud-btn-clear {
position: absolute;
right: 110px; /* 调整位置以避开计算按钮 */
background: transparent;
border: none;
color: rgba(0, 255, 255, 0.4);
font-size: 1.2rem;
cursor: pointer;
width: 20px;
height: 20px;
display: none; /* 默认隐藏 */
z-index: 4;
}
.ai-hud-btn-clear:hover {
color: #00ffff;
}
/* 按钮 */
.ai-hud-btn {
border-radius: 5px;
color: rgba(0, 255, 255, 0.4);
background: rgba(0, 255, 255, 0.05);
border: 1px solid rgba(0, 255, 255, 0.4);
padding: 0.6rem 1rem;
cursor: pointer;
margin-left: 0.75rem;
transition: all 0.4s ease;
box-shadow: 0 0 8px rgba(0, 255, 255, 0.3);
}
/* 按钮: 聚焦 */
.ai-hud-btn:hover {
box-shadow: 0 0 10px rgba(0, 255, 255, 0.5), 0 0 20px rgba(0, 255, 255, 0.3);
background: rgba(0, 255, 255, 0.08);
}
/* 按钮: 点击 */
.ai-hud-btn:active {
box-shadow: 0 0 10px rgba(0, 255, 255, 0.8), 0 0 20px rgba(0, 255, 255, 0.5);
background: rgba(0, 255, 255, 0.08);
}
/* 复制按钮 */
.ai-hud-btn-copy {
color: rgb(93 178 26);
background: transparent;
border: none;
padding: 0 5px;
cursor: pointer;
}
/* 标题 */
.ai-hud-title {
text-align: center;
font-size: 1.5rem;
padding-bottom: 20px;
}
/* 内容 */
.ai-hud-content {
border: 1px solid rgba(0, 255, 255, 0.4);
margin-top: 10px;
padding: 10px 20px;
border-radius: 5px;
}
/* 加载动画 */
.loading {
text-align: center;
padding: 20px;
}
.spinner {
border: 2px solid rgba(0, 255, 255, 0.3);
border-top: 2px solid #00ffff;
border-radius: 50%;
width: 20px;
height: 20px;
animation: spin 1s linear infinite;
margin: 0 auto;
}
@keyframes spin {
0% {
transform: rotate(0deg);
}
100% {
transform: rotate(360deg);
}
}
</style>
</head>
<body>
<!-- 网格背景 -->
<div class="grid-bg"></div>
<!-- 粒子背景 -->
<div class="particles" id="particles"></div>
<div class="ai-hud-component">
<div class="ai-hud-frame">
<div class="ai-hud-title">
FinalShell 离线激活码生成器
<div style="font-size: 12px;margin-top: 10px">
注意:本工具仅用于学习和测试目的,请支持正版软件
</div>
</div>
<div class="ai-hud-input-wrapper">
<input type="text" id="machineIdInput" class="ai-hud-input" placeholder="请输入机器码..."/>
<button class="ai-hud-btn-clear" id="clearBtn" onclick="clearInput()" title="清空">×</button>
<button class="ai-hud-btn" id="generateBtn" onclick="generateActivationCode()">开始计算</button>
</div>
<div id="result">
</div>
</div>
<div style="position: absolute;bottom: 10px">
© 2025 FinalShell激活码生成器 | 安全可靠 | 离线使用
</div>
</div>
<script>
// 清空输入框函数
function clearInput() {
const input = document.getElementById('machineIdInput');
input.value = '';
// 隐藏清除按钮
document.getElementById('clearBtn').style.display = 'none';
// 聚焦到输入框
input.focus();
}
// 监听输入框变化,控制清除按钮显示/隐藏
document.getElementById('machineIdInput').addEventListener('input', function () {
const clearBtn = document.getElementById('clearBtn');
if (this.value.trim() !== '') {
clearBtn.style.display = 'block';
} else {
clearBtn.style.display = 'none';
}
});
// 生成激活码主函数
function generateActivationCode() {
const machineId = document.getElementById('machineIdInput').value.trim();
// 输入验证
if (!machineId) {
showNotification('请输入机器码');
return;
}
// 显示加载状态
showLoading();
// 发送请求到API
fetch(`https://t.543.ink/v1/api/activat?machineId=${encodeURIComponent(machineId)}`)
.then(response => {
// 检查响应状态
if (!response.ok) {
throw new Error(`HTTP error! status: ${response.status}`);
}
return response.json();
})
.then(data => {
// 检查API返回是否成功
if (data && data.code === 200) {
// 处理返回的数据并在页面上显示结果
displayResult(data.data);
} else {
// 处理API错误
throw new Error(data.message || 'API返回错误');
}
})
.catch(error => {
console.error('Error:', error);
showError('请求失败: ' + error.message);
});
}
// 展示结果函数
function displayResult(data) {
const resultDiv = document.getElementById('result');
// 清空之前的结果
resultDiv.innerHTML = '';
// 检查数据是否存在且为数组
if (!data || !Array.isArray(data) || data.length === 0) {
resultDiv.innerHTML = '<div class="ai-hud-content">未找到相关数据</div>';
return;
}
// 遍历数据并生成结果HTML
data.forEach(item => {
const version = item.version || 'N/A';
const advanced = item.advanced || 'N/A';
const professional = item.professional || 'N/A';
const contentDiv = document.createElement('div');
contentDiv.className = 'ai-hud-content';
contentDiv.innerHTML = `
<div>版本号: ${version}</div>
<div>
<span>高级版: ${advanced}</span>
<button class="ai-hud-btn-copy" onclick="copyToClipboard('${advanced}')">复制</button>
</div>
<div>
<span>专业版: ${professional}</span>
<button class="ai-hud-btn-copy" onclick="copyToClipboard('${professional}')">复制</button>
</div>
`;
resultDiv.appendChild(contentDiv);
});
}
// 复制到剪贴板功能
function copyToClipboard(text) {
navigator.clipboard.writeText(text).then(() => {
// 使用更友好的提示方式
showNotification('已复制到剪贴板');
}).catch(err => {
console.error('复制失败:', err);
showNotification('复制失败,请手动复制');
});
}
// 显示加载状态
function showLoading() {
const resultDiv = document.getElementById('result');
resultDiv.innerHTML = `
<div class="loading">
<div class="spinner"></div>
<p>正在计算中...</p>
</div>
`;
}
// 显示错误信息
function showError(message) {
const resultDiv = document.getElementById('result');
resultDiv.innerHTML = `<div class="ai-hud-content" style="color: #ff4d4d;">错误: ${message}</div>`;
// 重新启用按钮
const btn = document.getElementById('generateBtn');
btn.disabled = false;
btn.textContent = '开始计算';
}
// 显示通知消息
function showNotification(message) {
// 检查是否已存在通知容器,如果没有则创建
let notificationContainer = document.getElementById('notification-container');
if (!notificationContainer) {
notificationContainer = document.createElement('div');
notificationContainer.id = 'notification-container';
notificationContainer.style.position = 'fixed';
notificationContainer.style.top = '5%';
notificationContainer.style.left = '50%';
notificationContainer.style.transform = 'translateX(-50%)';
notificationContainer.style.zIndex = '1000';
notificationContainer.style.display = 'flex';
notificationContainer.style.flexDirection = 'column';
notificationContainer.style.alignItems = 'center';
notificationContainer.style.gap = '10px';
document.body.appendChild(notificationContainer);
}
// 创建通知元素(保留原始样式)
const notification = document.createElement('div');
notification.textContent = message;
notification.style.border = '1px solid rgba(0, 255, 255, 0.4)';
notification.style.color = '#00ffff';
notification.style.padding = '5px 30px';
notification.style.borderRadius = '5px';
notification.style.fontFamily = 'sans-serif';
notification.style.fontSize = '16px';
notification.style.textAlign = 'center';
notification.style.minWidth = '200px';
notification.style.backgroundColor = 'rgba(0, 0, 0, 0.2)';
notification.style.opacity = '0';
notification.style.transition = 'opacity 0.3s ease-in-out';
// 添加到容器中
notificationContainer.appendChild(notification);
// 触发动画显示
setTimeout(() => {
notification.style.opacity = '1';
}, 10);
// 3秒后自动移除
setTimeout(() => {
notification.style.opacity = '0';
setTimeout(() => {
if (notification.parentNode) {
notification.parentNode.removeChild(notification);
}
// 如果容器为空,则移除容器
if (notificationContainer.children.length === 0) {
if (notificationContainer.parentNode) {
notificationContainer.parentNode.removeChild(notificationContainer);
}
}
}, 300);
}, 3000);
}
// 创建粒子效果
function createParticles() {
const particlesContainer = document.getElementById('particles');
const particleCount = 50;
for (let i = 0; i < particleCount; i++) {
const particle = document.createElement('div');
particle.className = 'particle';
particle.style.left = Math.random() * 100 + '%';
particle.style.animationDelay = Math.random() * 8 + 's';
particle.style.animationDuration = (Math.random() * 3 + 5) + 's';
// 随机颜色
const colors = ['#00ffff', '#ff00ff', '#ffff00', '#00ff00'];
const randomColor = colors[Math.floor(Math.random() * colors.length)];
particle.style.background = randomColor;
particle.style.boxShadow = `0 0 10px ${randomColor}`;
particlesContainer.appendChild(particle);
}
}
// 初始化粒子
createParticles();
// 定期添加新粒子
setInterval(() => {
if (document.querySelectorAll('.particle').length < 100) {
const particle = document.createElement('div');
particle.className = 'particle';
particle.style.left = Math.random() * 100 + '%';
particle.style.animationDuration = (Math.random() * 3 + 5) + 's';
const colors = ['#00ffff', '#ff00ff', '#ffff00', '#00ff00'];
const randomColor = colors[Math.floor(Math.random() * colors.length)];
particle.style.background = randomColor;
particle.style.boxShadow = `0 0 10px ${randomColor}`;
document.getElementById('particles').appendChild(particle);
// 粒子动画结束后移除
setTimeout(() => {
if (particle.parentNode) {
particle.parentNode.removeChild(particle);
}
}, 8000);
}
}, 200);
</script>
<script>
!function(p){"use strict";!function(t){var s=window,e=document,i=p,c="".concat("https:"===e.location.protocol?"https://":"http://","sdk.51.la/js-sdk-pro.min.js"),n=e.createElement("script"),r=e.getElementsByTagName("script")[0];n.type="text/javascript",n.setAttribute("charset","UTF-8"),n.async=!0,n.src=c,n.id="LA_COLLECT",i.d=n;var o=function(){s.LA.ids.push(i)};s.LA?s.LA.ids&&o():(s.LA=p,s.LA.ids=[],o()),r.parentNode.insertBefore(n,r)}()}({id:"3OGKOla4LiTErC1d",ck:"3OGKOla4LiTErC1d"});
</script>
<script id="LA-DATA-WIDGET" crossorigin="anonymous" charset="UTF-8" src="https://v6-widget.51.la/v6/3OGKOla4LiTErC1d/quote.js?theme=#00FFFF,#333333,#00FFFF,#00FFFF,#FFFFFF,#00FFFF,12&f=12&display=0,0,0,1,0,1,1,1"></script>
</body>
</html>
账号密码需要自己改下,搜索xxx改为你想设置的,首次加载网页的时候会有点慢,我没写成两个容器
注意:部署完别大量分享
# =============================================================================
# Z-Image-Turbo Gradio Web UI (文生图) - Gradio + ComfyUI 后端
# =============================================================================
# 部署命令: modal deploy z_image_turbo_gradio_deploy.py
# =============================================================================

import modal
import json
import os
import subprocess
from pathlib import Path

# =============================================================================
# 镜像配置 - 强制重建: 2025-12-02-v15 (参考wan2简洁风格)
# =============================================================================
comfy_image = (
    modal.Image.debian_slim(python_version="3.11")
    .apt_install("git", "wget", "curl")
    .pip_install(
        "fastapi[standard]==0.115.4",
        "comfy-cli==1.5.3",
        "requests==2.32.3",
        "huggingface_hub[hf_transfer]==0.34.4",
        "pillow",
        "websocket-client",
    )
    .env({"HF_HUB_ENABLE_HF_TRANSFER": "1"})
    .run_commands(
        "comfy --skip-prompt install --fast-deps --nvidia",
        # 更新到最新 master 代码
        "cd /root/comfy/ComfyUI && git fetch origin && git reset --hard origin/master",
        # 添加 z_image 到 DualCLIPLoader 类型列表 (nodes.py)
        "sed -i 's/\"hunyuan_video_15\"\\]/\"hunyuan_video_15\", \"z_image\"]/g' /root/comfy/ComfyUI/nodes.py",
        # 添加 Z_IMAGE 到 CLIPType 枚举 (sd.py)
        "sed -i 's/CHROMA = 15/CHROMA = 15\\n    Z_IMAGE = 16/g' /root/comfy/ComfyUI/comfy/sd.py",
        # 添加 z_image 处理逻辑到 load_dual_clip
        "sed -i 's/elif clip_type == CLIPType.HUNYUAN_IMAGE:/elif clip_type == CLIPType.Z_IMAGE:\\n            clip_target.clip = comfy.text_encoders.z_image.te(**llama_detect(clip_data))\\n            clip_target.tokenizer = comfy.text_encoders.z_image.ZImageTokenizer\\n        elif clip_type == CLIPType.HUNYUAN_IMAGE:/g' /root/comfy/ComfyUI/comfy/sd.py",
    )
    .pip_install("gradio==3.41.0")
)

app = modal.App(name="z-image-turbo-gradio", image=comfy_image)
vol = modal.Volume.from_name("z-image-turbo-gradio-cache", create_if_missing=True)


# =============================================================================
# 模型下载函数
# =============================================================================
def download_models():
    """下载 Z-Image-Turbo 模型"""
    from huggingface_hub import hf_hub_download

    hf_token = os.getenv("HF_TOKEN")
    repo_id = "Comfy-Org/z_image_turbo"

    print(f"? 从 {repo_id} 下载模型...")

    models = [
        {
            "filename": "split_files/diffusion_models/z_image_turbo_bf16.safetensors",
            "target_dir": "/root/comfy/ComfyUI/models/diffusion_models",
            "target_name": "z_image_turbo_bf16.safetensors",
            "desc": "主扩散模型"
        },
        {
            "filename": "split_files/text_encoders/qwen_3_4b.safetensors",
            "target_dir": "/root/comfy/ComfyUI/models/text_encoders",
            "target_name": "qwen_3_4b.safetensors",
            "desc": "Qwen3 文本编码器"
        },
        {
            "filename": "split_files/vae/ae.safetensors",
            "target_dir": "/root/comfy/ComfyUI/models/vae",
            "target_name": "ae.safetensors",
            "desc": "VAE 解码器"
        }
    ]

    for model in models:
        target_path = f"{model['target_dir']}/{model['target_name']}"

        if os.path.exists(target_path) or os.path.islink(target_path):
            print(f"   ✅ {model['desc']} 已存在,跳过")
            continue

        print(f"? 下载 {model['desc']}: {model['target_name']}...")

        cached_path = hf_hub_download(
            repo_id=repo_id,
            filename=model["filename"],
            cache_dir="/cache",
            token=hf_token
        )

        Path(model["target_dir"]).mkdir(parents=True, exist_ok=True)
        subprocess.run(f"ln -sf {cached_path} {target_path}", shell=True, check=True)
        print(f"   ✅ {model['desc']} 完成")

    print("? 所有模型准备就绪!")


# =============================================================================
# Gradio 应用
# =============================================================================
@app.function(
    max_containers=1,
    gpu="L40S",
    volumes={"/cache": vol},
    timeout=86400,
    scaledown_window=600,
)
@modal.web_server(7860, startup_timeout=600)
def serve():
    """Z-Image-Turbo Gradio Web UI"""

    # 下载模型
    download_models()

    # 启动 ComfyUI 后端 (端口 8188)
    print("? 启动 ComfyUI 后端...")
    subprocess.Popen(
        "comfy launch -- --listen 127.0.0.1 --port 8188",
        shell=True
    )

    # 等待 ComfyUI 启动
    import time
    time.sleep(30)

    # 写入 Gradio 脚本
    gradio_script = '''
import gradio as gr
import requests
import json
import uuid
import time
import os
import io
import threading
from PIL import Image
import websocket

COMFYUI_URL = "http://127.0.0.1:8188"

# 队列管理 - 使用文件持久化统计
STATS_FILE = "/cache/stats.json"
queue_lock = threading.Lock()
queue_count = 0

# 内存缓存,避免频繁读取文件
_stats_cache = {'total': 0, 'date': ''}

def get_today():
    """获取今天日期 (UTC+8)"""
    import datetime
    # 使用 UTC+8 时区
    return (datetime.datetime.utcnow() + datetime.timedelta(hours=8)).strftime('%Y-%m-%d')

def load_stats():
    """从文件加载统计"""
    global _stats_cache
    try:
        if os.path.exists(STATS_FILE):
            with open(STATS_FILE, 'r') as f:
                data = json.load(f)
                _stats_cache['total'] = data.get('total_generated', 0)
                _stats_cache['date'] = data.get('date', '')
                print(f"[STATS] 加载统计: {_stats_cache}", flush=True)
                return _stats_cache['total'], _stats_cache['date']
    except Exception as e:
        print(f"[STATS] 加载失败: {e}", flush=True)
    return 0, ''

def save_stats(total):
    """保存统计到文件"""
    global _stats_cache
    try:
        today = get_today()
        _stats_cache = {'total': total, 'date': today}
        with open(STATS_FILE, 'w') as f:
            json.dump({'total_generated': total, 'date': today}, f)
            f.flush()
            os.fsync(f.fileno())  # 强制刷新到磁盘
        print(f"[STATS] 保存统计: total={total}, date={today}", flush=True)
    except Exception as e:
        print(f"[STATS] 保存失败: {e}", flush=True)

def get_total_generated():
    """获取今日生成总数"""
    global _stats_cache
    today = get_today()
    # 优先使用内存缓存
    if _stats_cache['date'] == today and _stats_cache['total'] > 0:
        return _stats_cache['total']
    # 否则从文件加载
    total, date = load_stats()
    if date != today:
        return 0  # 新的一天重置
    return total

def increment_total():
    """增加生成计数"""
    global _stats_cache
    today = get_today()
    # 使用内存缓存
    if _stats_cache['date'] == today:
        total = _stats_cache['total']
    else:
        total, date = load_stats()
        if date != today:
            total = 0
    total += 1
    save_stats(total)
    print(f"[STATS] 生成计数+1, 今日总计: {total}", flush=True)
    return total

def get_queue_status():
    """获取当前队列状态"""
    with queue_lock:
        if queue_count == 0:
            return "✅ 当前无排队,可立即生成"
        else:
            return f"⏳ 当前排队: {queue_count} 个任务等待中"

def get_stats():
    """获取统计信息"""
    with queue_lock:
        total = get_total_generated()
        return f"? 今日已生成: {total} 张 | 当前队列: {queue_count} 个"

# 启动时初始化加载统计
print("[STATS] 初始化加载统计...", flush=True)
load_stats()
print(f"[STATS] 初始化完成, 缓存: {_stats_cache}", flush=True)

# 分辨率选项
RESOLUTIONS = {
    "1:1 (1024x1024)": (1024, 1024),
    "16:9 (1024x576)": (1024, 576),
    "9:16 (576x1024)": (576, 1024),
    "4:3 (1024x768)": (1024, 768),
}

def create_workflow(prompt, width, height, steps, seed):
    """创建 ComfyUI 工作流"""
    return {
        "1": {
            "class_type": "UNETLoader",
            "inputs": {
                "unet_name": "z_image_turbo_bf16.safetensors",
                "weight_dtype": "default"
            }
        },
        "2": {
            "class_type": "DualCLIPLoader",
            "inputs": {
                "clip_name1": "qwen_3_4b.safetensors",
                "clip_name2": "qwen_3_4b.safetensors",
                "type": "z_image"
            }
        },
        "3": {
            "class_type": "VAELoader",
            "inputs": {
                "vae_name": "ae.safetensors"
            }
        },
        "4": {
            "class_type": "CLIPTextEncode",
            "inputs": {
                "text": prompt,
                "clip": ["2", 0]
            }
        },
        "6": {
            "class_type": "EmptyLatentImage",
            "inputs": {
                "width": width,
                "height": height,
                "batch_size": 1
            }
        },
        "7": {
            "class_type": "KSampler",
            "inputs": {
                "model": ["1", 0],
                "positive": ["4", 0],
                "negative": ["4", 0],
                "latent_image": ["6", 0],
                "seed": seed if seed != -1 else int(time.time() * 1000) % (2**32),
                "steps": steps,
                "cfg": 1.0,
                "sampler_name": "euler",
                "scheduler": "simple",
                "denoise": 1.0
            }
        },
        "8": {
            "class_type": "VAEDecode",
            "inputs": {
                "samples": ["7", 0],
                "vae": ["3", 0]
            }
        },
        "9": {
            "class_type": "SaveImage",
            "inputs": {
                "filename_prefix": "z_image_turbo",
                "images": ["8", 0]
            }
        }
    }

def generate_image(prompt, resolution, steps, seed):
    """生成图像"""
    global queue_count, total_generated

    if not prompt.strip():
        raise gr.Error("请输入提示词")

    # 加入队列
    with queue_lock:
        queue_count += 1
        my_position = queue_count

    print(f"[{time.strftime('%H:%M:%S')}] 任务加入队列,当前位置: {my_position}", flush=True)

    start_time = time.time()
    width, height = RESOLUTIONS[resolution]

    print(f"[{time.strftime('%H:%M:%S')}] 开始生成: {width}x{height}, {steps}步", flush=True)

    try:
        # 创建工作流
        workflow = create_workflow(prompt, width, height, int(steps), int(seed))

        # 生成客户端 ID
        client_id = str(uuid.uuid4())

        # 提交任务
        response = requests.post(
            f"{COMFYUI_URL}/prompt",
            json={"prompt": workflow, "client_id": client_id}
        )

        if response.status_code != 200:
            raise gr.Error(f"提交任务失败: {response.text}")

        prompt_id = response.json()["prompt_id"]
        print(f"[{time.strftime('%H:%M:%S')}] 任务已提交: {prompt_id}", flush=True)

        # 等待完成
        while True:
            time.sleep(0.5)
            history_response = requests.get(f"{COMFYUI_URL}/history/{prompt_id}")

            if history_response.status_code == 200:
                history = history_response.json()
                if prompt_id in history:
                    outputs = history[prompt_id].get("outputs", {})
                    if "9" in outputs and "images" in outputs["9"]:
                        image_info = outputs["9"]["images"][0]
                        filename = image_info["filename"]
                        subfolder = image_info.get("subfolder", "")

                        # 获取图像
                        params = {"filename": filename, "subfolder": subfolder, "type": "output"}
                        img_response = requests.get(f"{COMFYUI_URL}/view", params=params)

                        if img_response.status_code == 200:
                            # 保存图像
                            image_dir = "/tmp/gradio_images"
                            os.makedirs(image_dir, exist_ok=True)
                            image_path = f"{image_dir}/{uuid.uuid4()}.png"

                            image = Image.open(io.BytesIO(img_response.content))
                            image.save(image_path)

                            elapsed = time.time() - start_time
                            print(f"[{time.strftime('%H:%M:%S')}] 生成完成! 耗时: {elapsed:.1f}秒", flush=True)

                            # 完成,减少队列并更新统计
                            with queue_lock:
                                queue_count -= 1
                            increment_total()

                            return image_path

            # 超时检查 (5分钟)
            if time.time() - start_time > 300:
                with queue_lock:
                    queue_count -= 1
                raise gr.Error("生成超时,请重试")

    except gr.Error:
        raise
    except Exception as e:
        # 出错,减少队列
        with queue_lock:
            queue_count -= 1
        elapsed = time.time() - start_time
        print(f"[{time.strftime('%H:%M:%S')}] 错误: {e}")
        raise gr.Error(f"生成失败 ({elapsed:.0f}秒): {str(e)[:200]}")

# 示例提示词
example_prompts = [
    ["一只可爱的橘猫在阳光下打盹"],
    ["赛博朋克风格的未来城市夜景"],
    ["中国水墨画风格的山水"],
    ["宇航员在月球上骑自行车"],
]

# CSS - 参考 wan2 简洁风格
custom_css = """
html, body {
    background: linear-gradient(135deg, #f5f7fa 0%, #e4e8ec 100%) !important;
    min-height: 100vh !important;
}
.gradio-container {
    background: transparent !important;
}
h1, h2, h3 {
    background: linear-gradient(90deg, #10b981, #3b82f6);
    -webkit-background-clip: text;
    -webkit-text-fill-color: transparent;
}
/* 圆角样式 */
.gr-button, .gr-input, .gr-textbox textarea, .gr-box {
    border-radius: 8px !important;
}
.gr-image {
    border-radius: 12px !important;
    background: #fff !important;
}
"""

with gr.Blocks(css=custom_css, title="Z-Image-Turbo") as demo:
    gr.Markdown("# ? Z-Image-Turbo AI 图像生成")
    gr.Markdown("**文生图 (T2I) | Turbo 快速生成 | Powered by Z-Image**")

    # 队列状态显示
    with gr.Row():
        queue_status = gr.Markdown(value=get_queue_status())
        refresh_btn = gr.Button("? 刷新状态", scale=0)

    with gr.Row():
        stats_display = gr.Markdown(value=get_stats())

    with gr.Row():
        with gr.Column():
            prompt = gr.Textbox(
                label="提示词",
                lines=5,
                value="",
                placeholder="请输入您想要生成的图像描述..."
            )

            gr.Markdown("### ? 提示词示例 (点击使用)")
            gr.Examples(
                examples=example_prompts,
                inputs=prompt,
                label=""
            )

            with gr.Accordion("⚙️ 高级设置", open=False):
                resolution = gr.Dropdown(
                    choices=list(RESOLUTIONS.keys()),
                    value="1:1 (1024x1024)",
                    label="分辨率"
                )
                steps = gr.Slider(
                    minimum=4,
                    maximum=20,
                    value=4,
                    step=1,
                    label="采样步数"
                )
                seed = gr.Number(value=-1, label="种子 (-1 为随机)")

            gr.Markdown("? **推荐设置**: 4-8步即可获得高质量图像")
            btn = gr.Button("✨ 生成图像", variant="primary")

        with gr.Column():
            output = gr.Image(label="生成结果", type="filepath")

    # 刷新状态按钮 - 不走队列,立即执行
    def refresh_status():
        return get_queue_status(), get_stats()

    refresh_btn.click(
        refresh_status,
        outputs=[queue_status, stats_display],
        queue=False,  # 不走队列,避免等待
        api_name=False  # 不创建 API 端点
    )

    # 生成按钮 - 生成后自动刷新状态
    def generate_and_refresh(prompt, resolution, steps, seed):
        result = generate_image(prompt, resolution, steps, seed)
        return result, get_queue_status(), get_stats()

    btn.click(generate_and_refresh, [prompt, resolution, steps, seed], [output, queue_status, stats_display])

print("? 启动 Gradio 界面...")
demo.launch(
    server_name="0.0.0.0",
    server_port=7860,
    share=False,
    auth=("xxx", "xxx"), // 账号密码自己改下
    allowed_paths=["/tmp/gradio_images", "/tmp/gradio", "/tmp"]
)

import time
while True:
    time.sleep(1)
'''

    script_path = "/tmp/gradio_app.py"
    with open(script_path, "w") as f:
        f.write(gradio_script)

    subprocess.Popen(["python", script_path])


# =============================================================================
# 本地入口
# =============================================================================
@app.local_entrypoint()
def main():
    print("=" * 60)
    print("Z-Image-Turbo Gradio Web UI")
    print("=" * 60)
    print("\n? 模型: Comfy-Org/z_image_turbo")
    print("\n? GPU: L40S")
    print("\n? 特点:")
    print("   - Gradio 前端界面")
    print("   - ComfyUI 后端推理")
    print("   - 支持多种分辨率")
    print("   - 4-20步快速生成")
    print("\n? 部署命令: modal deploy z_image_turbo_gradio_deploy.py")
    print("=" * 60)
AI图像生成网页交互平台 - 基于Streamlit构建的Web应用,提供简洁的用户界面和实用的图像生成功能

showimageweb/
├── app.py                    # 主应用文件(Streamlit界面)
├── Dockerfile               # Docker构建配置
├── requirements.txt         # Python依赖包
├── docker-compose.yml       # Docker Compose配置
├── LICENSE                  # MIT许可证
├── README.md                # 项目文档
└── assets/
└── showimage-web-demo.png # 应用预览图# 克隆项目
git clone https://github.com/kaima2022/showimageweb.git
cd showimageweb
# 使用 Docker Compose 启动
docker compose up -d# 克隆项目
git clone https://github.com/kaima2022/showimageweb.git
cd showimageweb
# 安装依赖
pip install -r requirements.txt
# 启动
streamlit run app.py --server.address=0.0.0.0 --server.port=8501http://localhost:8501公开KEY:sk-zKTGcw8llBFZLpXAAsxTmMSmCfY8DNfe
应用支持任意兼容的AI图像生成API:
{"prompt": "...", "seed": ...}{"base64": "..."}https://api.example.com/v1/generate)# Streamlit配置
STREAMLIT_SERVER_ADDRESS=0.0.0.0
STREAMLIT_SERVER_PORT=8501
STREAMLIT_SERVER_HEADLESS=true
# 时区设置
TZ=Asia/Shanghaigit checkout -b feature/AmazingFeature)git commit -m 'Add some AmazingFeature')git push origin feature/AmazingFeature)QQNT 42744 存在广泛扩散且严重威胁安全的XSS安全问题 所有在此版本的用户看到特定代码会自动在本机执行 请各位管理以及群友为了安全问题立刻降级QQNT 42744 版本查看左下角-关于 复现方法简单到令人发指 不提供复现 极易利用
2015.11.28 QQ内部灰度测试安装:QQNT42744

昨天就已经开源了,但是测试的时候智能使用官方接口,今天下午更新了,而且提供了docker版,部署更简单了,刚刚试了一下,已经成功生成图片了,就是使用起来账号积分如流水。
让传播不再需要门槛,让创作从未如此简单
红墨首页

使用红墨生成的各类小红书封面 - AI驱动,风格统一,文字准确
前段时间默子在 Linux.do 发了一个用 Nano banana Pro 做 PPT 的帖子,收获了 600 多个赞。很多人用?Nano banana Pro 去做产品宣传图、直接生成漫画等等。我就在想:为什么不拿?2来做点更功利、更刺激的事情?
于是就有了这个项目。一句话一张图片生成小红书图文


AI 模型:
最简单的部署方式,一行命令即可启动:
docker run -d -p 12398:12398 -v ./output:/app/output histonemax/redink:latest访问 http://localhost:12398,在 Web 界面的设置页面配置你的 API Key 即可使用。
使用 docker-compose(可选):
下载 docker-compose.yml 后:
docker-compose up -dDocker 部署说明:
-v ./output:/app/output 持久化生成的图片-v ./text_providers.yaml:/app/text_providers.yaml前置要求:
git clone https://github.com/HisMax/RedInk.git
cd RedInk复制配置模板文件:
cp text_providers.yaml.example text_providers.yaml
cp image_providers.yaml.example image_providers.yaml
编辑配置文件,填入你的 API Key 和服务配置。也可以启动后在 Web 界面的设置页面进行配置。
uv synccd frontend
pnpm install启动后端:
uv run python -m backend.app启动前端:
cd frontend
pnpm dev项目支持两种配置方式:
配置文件: text_providers.yaml
# 当前激活的服务商
active_provider: openai

providers:
  # OpenAI 官方或兼容接口
  openai:
    type: openai_compatible
    api_key: sk-xxxxxxxxxxxxxxxxxxxx
    base_url: https://api.openai.com/v1
    model: gpt-4o

  # Google Gemini(原生接口)
  gemini:
    type: google_gemini
    api_key: AIzaxxxxxxxxxxxxxxxxxxxxxxxxx
model: gemini-2.0-flash配置文件: image_providers.yaml
# 当前激活的服务商
active_provider: gemini

providers:
  # Google Gemini 图片生成
  gemini:
    type: google_genai
    api_key: AIzaxxxxxxxxxxxxxxxxxxxxxxxxx
    model: gemini-3-pro-image-preview
    high_concurrency: false  # 高并发模式

  # OpenAI 兼容接口
  openai_image:
    type: image_api
    api_key: sk-xxxxxxxxxxxxxxxxxxxx
    base_url: https://your-api-endpoint.com
    model: dall-e-3
high_concurrency: false⚠️ GCP 300$ 试用账号不建议启用高并发,可能会触发速率限制导致生成失败。
API 配额限制:
生成时间:
欢迎提交 Issue 和 Pull Request!
如果这个项目对你有帮助,欢迎给个 Star ⭐
histonemax/redinkstore.updateImage 方法缺失导致的重新生成失败问题
本项目采用 CC BY-NC-SA 4.0 协议进行开源
你可以自由地:
但需要遵守以下条款:
如果你希望将本项目用于商业目的(包括但不限于):
请联系作者获取商业授权:
默子会根据你的具体使用场景提供灵活的商业授权方案。
本软件按"原样"提供,不提供任何形式的明示或暗示担保,包括但不限于适销性、特定用途的适用性和非侵权性的担保。在任何情况下,作者或版权持有人均不对任何索赔、损害或其他责任负责。
默子 (Histone) - AI 创业者 | Python & 深度学习
"让 AI 帮我们做更有创造力的事"
[bsgit user="wusimpl"]AntigravityQuotaWatcher[/bsgit]
 1](https://xiaohack.oss-cn-zhangjiakou.aliyuncs.com/typecho/2025/11/2947478344.png!mark)
 2](https://xiaohack.oss-cn-zhangjiakou.aliyuncs.com/typecho/2025/11/3305152143.png!mark)
下载插件,安装,重启,Over(github README 有详细方法)

Antigravity 通过内建的本地语言服务器通信获取数据,插件就是拿到这些端点,然后请求获取数据然后解析。开发过程的难点是获取 crsf token,最后在 AI 的帮助下还是很轻松地拿到了。
Gemini Low 和 High 共用一个配额
Claude 和 Claude Thinking 共用一个配额
GPT-OSS 单独一个配额
所以你们在插件里面看到的公用一个配额的模型剩余用量是一样的,Google 也是偷懒…
配额更新默认每 30s 刷新一次,可以在配置里面修改。
Antigravity 目前还只能算半成品,复杂一点的项目出错概率不小,需要等 Google 慢慢迭代修复,或者训练专门针对 code agent 的模型。不过胜在免费,拿来小修小改,做点 Code Review 之类的问题还是不大。


